Hybrid Search RAG – Advanced LangGraph Tutorial
Traditional RAG systems rely on either keyword-based search or vector similarity search. But what if you could combine both approaches? That’s exactly what hybrid search does: it merges the precision of keyword matching with the contextual understanding of vector embeddings. This approach is widely adopted to reduce hallucination in the RAG pipeline.
In this article, we’ll build a hybrid search RAG system using LangGraph and Qdrant. You’ll learn how to implement both Sparse and Dense embeddings, understand BM25 scoring, and create a stateful workflow that can handle complex document retrieval tasks. If you are new to LangGraph, check out our previous article for the detailed quickstart tutorial.
Keyword and Vector Search: What are Sparse and Dense Embeddings?
When building search systems, you have two main approaches:
Sparse Embeddings (Keyword Search): These work like traditional search engines. They focus on exact word matches and use techniques like TF-IDF or BM25. If you search for “machine learning,” it looks for documents containing those exact terms. The search mainly happens on the number of word occurrences/frequency of the words in the given documents.
Dense Embeddings (Vector Search): These capture semantic meaning. Even if a document doesn’t contain your exact keywords, it can still be relevant if it discusses similar concepts. A search for “ML” might return documents about “Artificial Intelligence” or “Neural Networks.”
Hybrid search, in simple words, combines two search techniques: Sparse Embeddings, which catch exact matches, and Dense Embeddings, which understand context and meaning.
“🚀 Want to build powerful generative AI workflows on Azure grounded in yur enterprise data?
Check out our hands-on course: AI Development with RAG and LangChain on Azure —perfect for mastering LangChain and prepping you for LangGraph workflows.
What is BM25?
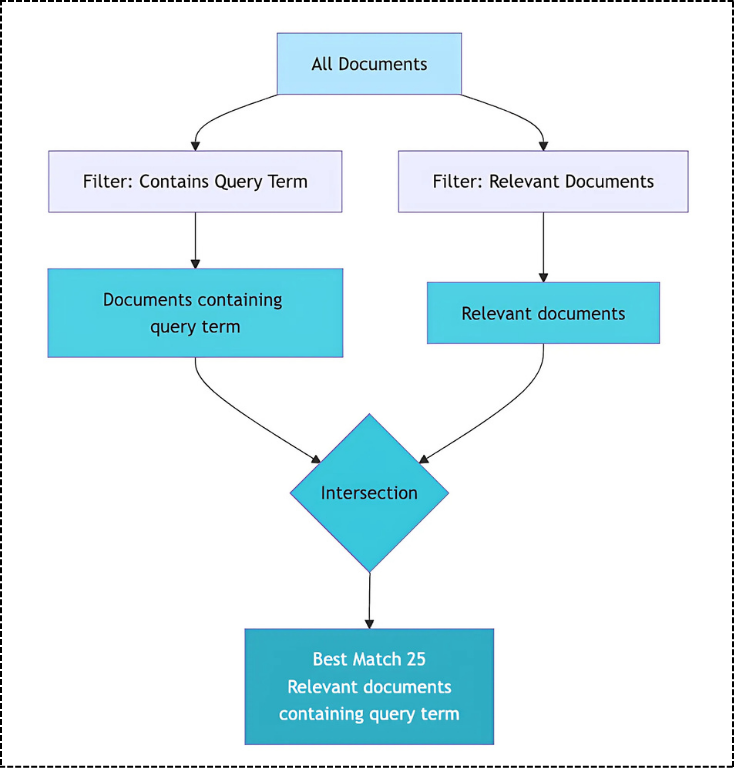
BM25 (Best Match 25) is a ranking function that scores documents based on keyword relevance. It’s an improvement over basic TF-IDF because it considers document length and term frequency in a more sophisticated way.
The algorithm works by:
- Analyzing how often a search term appears in a document
- Considering the document’s length (shorter documents with matching terms rank higher)
- Factoring in how common the term is across all documents
In simple words, BM25 is a smart librarian who knows which books contain your exact keywords and ranks them by relevance. Most of the frameworks like nltk, spacy and also the fastembed have the direct integration of BM25, so one doesn’t need to worry about the Math calculations and converting that to code.
Why Hybrid Search works in RAG?
Pure vector search, i.e., Dense Embeddings, might miss when someone searches for “API documentation,” but your document has the exact phrase “API docs.” Similarly, pure keyword search, i.e., Sparse Embeddings, won’t connect “Machine Learning” with “Neural Networks” even though they’re related concepts. Hybrid search solves this by running both searches simultaneously and combining their results for more accurate retrieval.
The hybrid approach merges BM25 scores with cosine similarity scores to rank results. This dual scoring ensures your RAG system retrieves both exact term matches and semantically similar content, giving the LLM more relevant context to generate accurate answers from your knowledge base.
Step-by-Step implementation to build a Hybrid Search RAG using LangGraph and Qdrant
The goal of this code implementation is to build a Chat with your own document with more precise responses. We’ll implement a complete hybrid search RAG system that combines keyword-based BM25 scoring with vector embeddings for document retrieval. The system will use LangGraph’s stateful workflows to orchestrate the retrieval and generation process, while Qdrant handles both Sparse and Dense vector storage.
Note: Most of the LangGraph statement management code is already covered in our previous Quickstart tutorial. If you get stuck, do check that article first to get the basics right, and then proceed with this.
Step 1: Initial Setup
First, let’s install all the required packages and download our sample document for processing. You can also upload your PDF and define the PDF path under the paper_filename.
![]()
!pip install qdrant-client langgraph
!pip install fastembed
!pip install langchain-google-genai
!pip install langchain langchain-community
!pip install langchain-qdrant
!pip install pdfplumber
The PDF document that we are using in our code implementation is a Research paper on React Agent, which is widely used in all the Agentic AI frameworks.
![]()
paper_url = "https://arxiv.org/pdf/2210.03629.pdf"
paper_filename = "react.pdf"
!wget -O {paper_filename} "{paper_url}"
This setup downloads the ReAct paper from arXiv, which we’ll use as our knowledge base. The packages include Qdrant for vector storage, FastEmbed for embeddings, and LangChain’s LangGraph for RAG orchestration.
Step 2: Load your data and Chunking
Langchain provides multiple PDFloaders, pick PDFPlumber over the other loaders when it comes to PDF. The PDFPlumberLoader extracts text while preserving structure, then convert this raw document it into manageable chunks.
![]()
import os
from langchain_community.document_loaders.pdf import PDFPlumberLoader
from langchain_text_splitters import RecursiveCharacterTextSplitter
loader = PDFPlumberLoader(paper_filename)
data = loader.load()
text_splitter = RecursiveCharacterTextSplitter(chunk_size=1024, chunk_overlap=150)
chunks = text_splitter.split_documents(data)
“🚀 Want to build powerful generative AI workflows?
Check out our hands-on course: Building Generative AI Apps with LangChain —perfect for mastering LangChain and prepping you for LangGraph workflows.
Step 3: Define your Vector Store and Embeddings
While defining the Hybrid search RAG, we need both Dense Embeddings i.e., FastEmbed BGE models and also Sparse Embeddings i.e., BM25.
![]()
from langchain_community.embeddings.fastembed import FastEmbedEmbeddings
from qdrant_client import QdrantClient, models
from qdrant_client.http.models import Distance, SparseVectorParams, VectorParams
from langchain_qdrant import FastEmbedSparse, QdrantVectorStore, RetrievalMode
embeddings = FastEmbedEmbeddings()
bm25_model = FastEmbedSparse(model_name="Qdrant/BM25")
Once the embeddings are defined, its time to initialize the Qdrant Client to save the data into vector database. To get the URL and API_KEY, create a free cluster on Qdrant Cloud.
In our N8N article, we also showcase how to get your URL and API_KEY, do checkout that article: No Code RAG using N8N.
![]()
collection_name = "research-app"
client = QdrantClient(
  prefer_grpc=True,
  url = "replace-with-your-endpoint",
  api_key= "replace-with-your-key"
)
Create a Qdrant collection with both Dense and Sparse vector configurations. Dense vectors use COSINE distance for semantic similarity, while Sparse vectors handle keyword matching through BM25 scoring.
![]()
client.create_collection(
  collection_name=collection_name,
  vectors_config={"Dense": VectorParams(size=384, distance=Distance.COSINE,on_disk=True)},
  Sparse_vectors_config={
      "Sparse": SparseVectorParams(index=models.SparseIndexParams(on_disk=False))
  }
)
Step 4: Index your document in the knowledge base
Indexing converts your document chunks into searchable vectors and stores them in Qdrant. The system generates both Dense embeddings (for semantic understanding) and Sparse embeddings (for keyword matching) for each chunk.
![]()
vector_store = QdrantVectorStore(
  client=client,
  collection_name=collection_name,
  embedding=embeddings,
  Sparse_embedding=bm25_model,
  retrieval_mode=RetrievalMode.HYBRID,
  vector_name="Dense",
  Sparse_vector_name="Sparse",
)
The Hybrid retrieval mode combines both embedding types during search, generating Dense embeddings for semantic matching and Sparse embeddings for keyword matching, then merging the results.
In Langchain, the vector database acts as the retriever to retrieve the relevant context from the vector database once the documents are added.
![]()
vector_store.add_documents(documents=chunks)
retriever = vector_store.as_retriever(search_kwargs={"k":4})
Step 5: Augment your prompt
In RAG, A stands for augmentation, where we need to provide some control to Large language models to restrict only towards the context. These templates i.e., System Prompt and User prompt ensure the model stays grounded in the provided context.
![]()
SYSTEM_TEMPLATE = """
You are an expert QA Assistant who answers questions using only the provided context as your source of information.
If the question is not from the provided context, say `I don't know. Not enough information received.`
"""
HUMAN_TEMPLATE = """
We have provided context information below.
CONTEXT: {context_str}
---------------------
Given this information, please answer the question: {query}
---------------------
If the question is not from the provided context, say `I don't know. Not enough information received.`
"""
🚀 Want to build powerful generative AI workflows on Azure grounded in yur enterprise data?
Check out our hands-on course: AI Development with RAG and LangChain on Azure —perfect for mastering LangChain and prepping you for LangGraph workflows.
Step 6: Initialize LangGraph State and Large Language Model
LangGraph’s StateGraph manages the flow between retrieval and generation. The RAGState TypedDict defines the data that passes between nodes, ensuring type safety and a clear data flow.
Here, nodes are simply functions that define the logic, such as search to fetch relevant context for the user query and generate to return the final response, which combines the retrieved context and the user query.
![]()
from langchain_google_genai import ChatGoogleGenerativeAI
from langgraph.graph import StateGraph, START, END
from langchain_core.documents import Document
from typing_extensions import List, TypedDict
class RAGState(TypedDict):
  question: str
  context: List[Document]
  answer: str
As for the Large language model to generate the final response, we will be using Google’s Gemini 2.5 Flash model. You can get your API key from Google AI Studio.
![]()
import os
os.environ['GOOGLE_API_KEY'] = "replace-with-your-key"
llm = ChatGoogleGenerativeAI(
  model="gemini-2.5-flash",
)
Step 7: Compile the StateGraph with RAG nodes
Our workflow has two main nodes: the search node retrieves relevant documents using Hybrid search with max marginal relevance to reduce redundancy, and the generate node takes the retrieved context and creates the final answer using the LLM.
![]()
def search(state: RAGState):
  retrieved_docs = vector_store.max_marginal_relevance_search(state["question"])
  return {"context": retrieved_docs}
def generate(state: RAGState):
  docs_content = "nn".join(doc.page_content for doc in state["context"])
  messages = [
      {"role": "system", "content": SYSTEM_TEMPLATE},
      {"role": "user", "content": HUMAN_TEMPLATE.format(context_str=docs_content, query=state["question"])},
  ]
  response = llm.invoke(messages)
  return {"answer": response.content}
The StateGraph creates a clear workflow: search retrieves relevant documents, then generate creates the final answer.
![]()
graph_node = StateGraph(RAGState).add_sequence([search, generate])
graph_node.add_edge(START, "search")
graph_node.add_edge("search", "generate")
graph_node.add_edge("generate", END)
graph = graph_node.compile()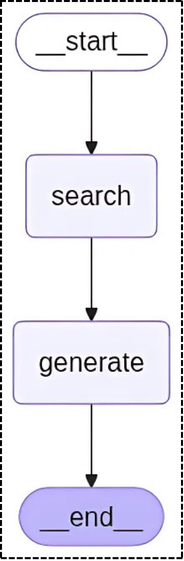
Step 8: Execute User Query
The first query should return specific information about React agent evaluation from the paper. The second query tests the system’s ability to refuse questions outside its knowledge base, demonstrating proper grounding and avoiding hallucination.
![]()
response1 = graph.invoke({"question": "how to evaluate React agent?"})
print(response1['answer'])
response2 = graph.invoke({"question": "What is the meaning of life?"})
print(response2['answer'])
🎓 Your AI journey doesn’t end here!
Enroll today in Building Generative AI Apps with LangChain and master the fundamentals essential for powerful LangGraph workflows.
Final Words
Hybrid search RAG combines the precision of keyword matching with the contextual understanding of vector embeddings. This approach is particularly valuable for technical documentation, legal documents, and domain-specific knowledge bases where both terminology and concepts matter.
The combination of Sparse and Dense embeddings ensures you don’t miss relevant information, whether it’s an exact keyword match or a semantically similar concept. In the next article, we will explore how to connect Long-Term Memory to your LLM-based applications.


