
aman
A data scientist with a strong focus in AI/ML, this individual is recognized as a Google Developer Expert and actively contributes to the open-source community.
Vibe coding with Copilot using the MCP Server
Large Language Models (LLMs) have seen widespread adoption among end-users and developers alike. These AI-powered tools are now commonly used for various tasks such as generating code, fixing issues, and optimizing software development processes. However, when integrating LLMs into an application, developers often need to connect different data sources and tools to maximize functionality. This is where Model Context Protocol (MCP) comes in.
Model Context Protocol (MCP) is a standardized approach that provides additional context to AI applications using Agents or Large Language Models in the backend. MCP helps improve data interactions and integration, ensuring that the AI-powered development environment is more seamless and effective.
Connecting an MCP server to tools like GitHub Copilot can drastically enhance a developer’s coding capabilities. By leveraging MCP, developers can improve their vibe coding skills, facilitating a more efficient, accurate, and contextually aware development experience.
Learning Objectives:
- Understand the issues with Large Language Models (LLMs) and how the Model Context Protocol (MCP) addresses them.
- Learn how MCP enhances the interaction between various AI applications and data sources.
- Assess whether MCP is overhyped or genuinely needed in the world of software development.
- Learn how to connect an MCP server to Microsoft GitHub Copilot to enhance vibe coding capabilities.
Who is This For?
- Developers are looking to enhance their AI-driven development workflows.
- Technical leads are seeking to optimize the integration of LLMs and tools like GitHub Copilot.
- Software engineers are interested in improving context awareness within their AI applications.
- AI enthusiasts are exploring how to streamline the use of Large Language Models in real-world applications.
- Novice developers wanting to learn the fundamentals of Model Context Protocol (MCP) and its benefits.
- Experienced developers aiming to refine their coding processes and improve efficiency using MCP integration.
- Teams are working on complex AI projects that require seamless data source integration and advanced AI capabilities.
What is Model Context Protocol (MCP)?
Model Context Protocol (MCP) has been gaining significant attention in the tech community over the past few months. Introduced by Anthropic on November 25, 2024, MCP aims to bridge the gap between AI assistants and the systems where essential data resides, such as content repositories, business tools, and development environments. The protocol is centered around the name itself:
- Model: Refers to applications utilizing AI agents or Large Language Models (LLMs).
- Context: Provides additional external information to support the model’s operations.
Protocol: A standardized set of rules that define how the model interacts with and uses external context.
Why is Model Context Protocol Important?
Let’s explore the pain point that MCP is designed to solve. Despite advancements in the reasoning capabilities, quality, and output of Large Language Models, they still face a critical challenge: access to external data. Without seamless connections to real-time information, these models remain constrained by data silos.
Currently, when developers want to integrate an LLM with a new data source, they often need to build a custom integration each time. Here are a few examples:
- Want to connect an LLM to local files? That requires a custom job.
- Need to sync the model with Google Calendar? Another custom job.
- Want the model to access an internal CRM database? You guessed it—another custom job.
This fragmented approach creates inefficiencies and unnecessary complexity.
How Model Context Protocol Solves This
Model Context Protocol (MCP) addresses these challenges by offering a standardized method to connect models to external data sources. Rather than requiring unique integrations for each new data source, MCP acts as a universal adapter. This means developers can now use a common set of rules for all integrations, reducing the need for redundant, custom work.
Key benefits of MCP:
- Simplifies the process of connecting LLMs to various data sources.
- Reduces the need for custom integrations for each tool or data repository.
- Streamlines AI application development by standardizing the way models fetch and use external data.
By adopting MCP, developers can enhance the capability and versatility of AI assistants and Large Language Models, making them more efficient, adaptable, and capable of working with real-time data from a wide variety of sources.
How does MCP work?
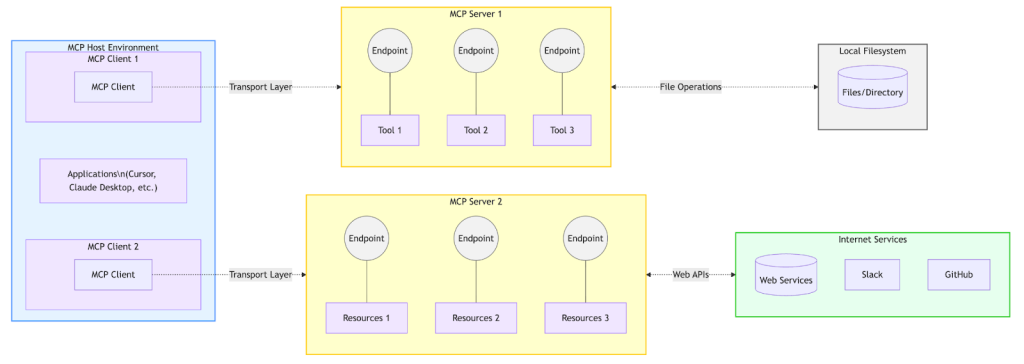
In a typical MCP setup, there are four main components: Host, Client, Transport Layer, and Server. The core components are MCP Clients and MCP Servers, which work together to enable seamless communication and data exchange between external tools and AI applications.
- MCP Clients: These reside within the host environment (e.g., Cursor, Claude Desktop, or any application) and need to interact with external tools and data. The client acts as a messenger, requesting additional context or information from external systems.
- Transport Layer: This layer facilitates communication between the MCP Clients and MCP Servers. There are two primary transport mechanisms:
- STDIO (Standard Input/Output): This lightweight mechanism is used when both the client and server are on the same system. It is the default transport layer in MCP.
- SSE (Server-Sent Events): This mechanism is used for communication over the web (HTTP/Remote), enabling continuous, real-time data interaction between the client and the server.
- MCP Servers: These servers act as warehouses filled with various tools and resources. Think of an MCP Server as an API of APIs. It contains the custom tool logic and implementations, whether it’s Web APIs like Google Search, GitHub integration, or resource collections such as Slack, Google Drive, and more. The context that the AI needs is stored inside the server and transmitted to the client. The communication follows a standardized message format using JSON-RPC 2.0.
The Need for Model Context Protocol (MCP) – Is It Overhyped?
MCP is not a groundbreaking concept. We already have features like function calling in LLMs (Large Language Models) that provide external context. However, MCP stands out by offering a more streamlined and standardized approach to integrating external tools and data sources.
- Instead of building custom integrations for each new API or database, MCP allows developers to create or plug into an MCP Server once, and then any MCP-compatible client (such as Claude Desktop) can easily utilize it. This drastically reduces the time and effort required for developers to connect their AI models with various external resources.
- When someone else builds a new tool with an MCP server, you no longer need to reinvent the integration. You simply connect, and it works seamlessly. This approach promotes the development of a unified ecosystem, rather than isolated silos.
As the MCP community grows, servers for popular services like search, GitHub, Slack, and many others are already being developed. This makes it easier for developers and AI agents to integrate new capabilities without starting from scratch every time.
Why Should Developers Use Model Context Protocol (MCP)?
- Simplifies integration: With MCP, developers can integrate external data sources once and reuse them across multiple tools and platforms, saving time and resources.
- Enhances efficiency: The standardized approach to handling external data sources improves the speed and reliability of AI applications.
- Builds a scalable ecosystem: As the MCP ecosystem expands, it allows developers to access a wide range of pre-built servers that integrate with popular platforms like Google, GitHub, and Slack, making AI development easier and more efficient.
By adopting Model Context Protocol, developers can enhance their AI applications, optimize workflows, and ensure that Large Language Models (LLMs) and other AI agents are more effective in interacting with real-time data from various external systems.
Connect the MCP Server to Microsoft GitHub Copilot
Now that we understand what MCP is, it’s time to connect it to Microsoft GitHub Copilot to improve your vibe coding skills. The term “Vibe Coding” gained traction following a tweet by Andrej Karpathy, who described a coding experience with AI assistance. Vibe Code- where you fully give in to the vibes, embrace exponentials, and forget that the code even exists. We will be adding a search capability, like Tavily, to give the AI Agent browsing ability. That being said, you can connect to any MCP server. Here’s a GitHub repo that contains the syntax for multiple MCP servers.
Step 1: Install the Copilot Extension on VS Code
First and foremost, we need to have the VS Code IDE installed. Once it’s done, you need to install the GitHub Copilot extension. Once the extension is installed, you should notice two extensions being downloaded: GitHub Copilot and Copilot Chat. Copilot chat is where Microsoft launched the Agent mode; we will be using that to set up the MCP.

Step 2: Enable Agent Mode
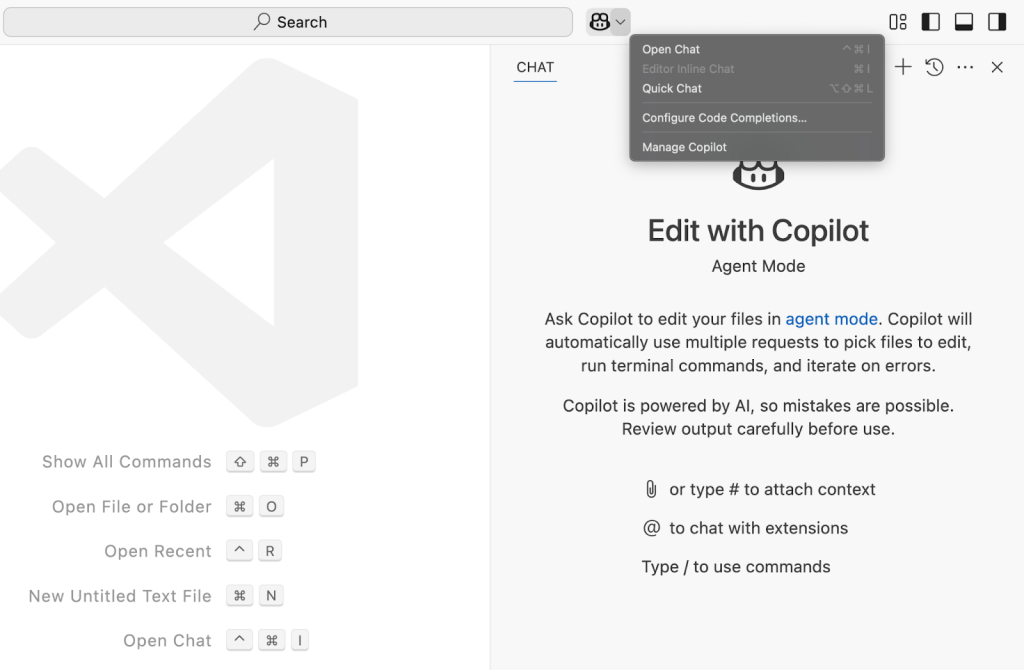
Once the extension is installed, restart your VS Code. Just make sure both extensions are enabled before restarting. Now, when you open VS Code again, you should see the Copilot icon on the top title bar. Click on it and select Open Chat.
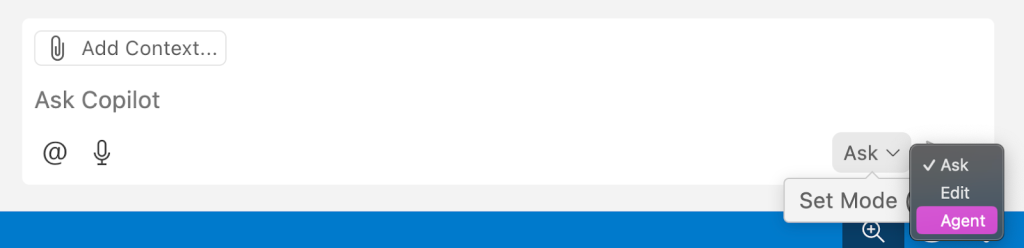
By default, it will be in Ask mode — you need to switch it to Agent mode.
Step 3: Add the MCP Server configuration
It’s time to connect the MCP server to Copilot. To do that, we need to add a JSON syntax inside the VS Code settings.json. To configure an MCP server for all your workspaces, simply add the server details to your user settings. This way, you can reuse the same server configuration across multiple projects. Just specify the server under the mcp (open: vscode://settings/mcp) section in the VS Code user settings to enable it across all workspaces.
Syntax of MCP Server - JSON File:
The MCP server mainly contains: command, args, and env. Let’s look at the syntax first to see how this is written.
// settings.json
{
“mcp”: {
“servers”: {
“my-mcp-server”: {
“type”: “stdio”,
“command”: “my-command”,
“args”: [],
“env”: {}
}
}
}
}
- The main key is mcp, and the first sub-key needs to be servers.
- Then, you define the name of the MCP server — for example, Qdrant, Tavily, GitHub, and so on. In the syntax, we use a placeholder like my-mcp-server.
- As mentioned earlier, by default, the transport mechanism is stdio.
- Now, coming to the three major keys inside each server:
- command: Defines how the MCP server should be installed, whether through docker, npx (for JavaScript/TypeScript), or uvx (for Python).
- args: List of arguments needed to interact with the MCP server, like URL, permissions, or file path setups.
- env: Environment variables, for example, API keys needed to connect with the MCP server.
Tavily MCP Server - Example
The reason we are using the Tavily MCP is that it helps browse the web and fetch the most relevant context using advanced search arguments. For example, as developers, since we often work with the latest frameworks, using this tool, we can quickly pull the release notes for a framework, helping with vibe coding the latest dependencies easily.
Get your Tavily API key from here, it’s free: https://app.tavily.com/home
Reminder: The example needs to be added in settings.json: Open vscode://settings/mcp and click on Edit settings.json
“mcp”: {
“servers”: {
“tavily”: {
“command”: “/opt/homebrew/bin/npx”,
“args”: [
“-y”,
“@mcptools/mcp-tavily”
],
“env”: {
“TAVILY_API_KEY”: “replace-with-your-key”
}
}
}
},
“chat.mcp.discovery.enabled”: true
Make sure to update: replace-with-your-key with your actual Tavily API key. If you notice, we also added one more argument: “chat.mcp.discovery.enabled“: true. This lets clients like Claude Desktop, Cursor, or Windsurf auto-discover other MCP servers if you have them set up. You can keep it false if you don’t need that. This is just optional.
Step 4: Verify the MCP server on Copilot
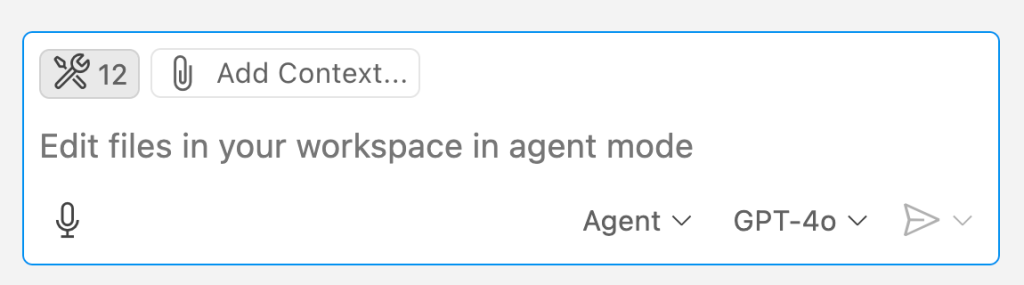
Once you add the above JSON syntax inside settings.json, you’ll notice a small settings icon with a number. That number shows how many tools are connected through your MCP servers. Note: In my system, I have two MCP servers, so it shows 12 tools in Figure 5, but the Tavily MCP server alone contains only 4 tools, shown in Figure 6.
Tavily MCP server contains 4 tools: search, searchContext, searchQNA, and extract. Based on the user’s question, the Agent mode automatically picks the most relevant tool to complete the task.

Since all the setup is done, it’s time to ask a user a question and check what tool the Agent mode triggered. Refer to Figure 7.

Final Words: The Power of Model Context Protocol (MCP) in AI Development
Model Context Protocol (MCP) introduces a simple yet powerful concept that transforms how developers integrate external tools and data sources into AI applications. Rather than building multiple custom integrations for each new tool or platform, MCP allows developers to create a single, standardized connection. This drastically reduces the complexity and time spent on repetitive integration tasks, while providing a more seamless and scalable solution.
For example, with the GitHub Copilot and Tavily MCP server setup, developers can now enhance their coding environment by enabling the ability to search, fetch context, and vibe code smarter. This MCP integration allows for more effective and efficient interactions with external data sources, making AI-assisted coding more intuitive and powerful.
MCP is just the beginning. You can further extend its capabilities by developing and integrating custom servers tailored to your unique workflow. By leveraging MCP, developers can create a flexible, scalable AI ecosystem that simplifies the integration of external tools, enhances real-time data access, and improves the overall effectiveness of Large Language Models (LLMs).
As MCP adoption grows, the potential for AI-driven development becomes even more exciting. Whether you’re building AI assistants, vibe coding tools, or other intelligent applications, MCP is a game-changing framework that offers developers the flexibility and scalability they need to remain ahead in the rapidly evolving world of AI technology.
Ready to enhance your coding environment with Model Context Protocol?
Start integrating MCP into your workflows today and unlock the full potential of AI-powered development. Get in touch with us to learn more about MCP setups, custom server development, and how you can streamline your AI applications with MCP.