How to Build a No-Code MCP Agent with n8n?
Working with AI Agents often means dealing with complex integrations, scattered data sources, and limited communication between different systems. You might have data in your CRM, files in Google Drive, and APIs across various platforms, but getting your AI Agent to access and work with all of them can require multiple custom code integrations.
That’s where the Model Context Protocol (MCP) comes in.
Model Context Protocol, aka MCP, is a standardized way for AI Agents to connect with external data sources and tools. Instead of building custom integrations for every single service, MCP provides a standard protocol that lets your Agents communicate with any MCP-compatible server. In this guide, we’ll explore what MCP is, understand its core transport mechanisms, and walk you through building a no-code MCP Agent using n8n that can interact with the MCP Server tool without writing a single line of code.
What You'll Learn in This No-Code MCP Agent Tutorial?
In this article, you’ll learn how to build a no-code MCP Agent using n8n.
- We’ll primarily explore the limitations of traditional AI Agent architectures when working with multiple data sources and external tools.
- Since we’ll be using the MCP Agent via n8n, which is a hosted platform, we need to connect the MCP tool using the SSE transport mechanism.
- Therefore, we’ll also discuss the two transport mechanisms supported by MCP: SSE and STDIO.
- Implement the N8N workflow using AI Agent and MCP Client hosted on the SSE MCP Server.
What is the need for the Model Context Protocol- MCP?
Traditional AI Agents face a fundamental challenge when it comes to accessing external data and tools. Each service requires its own custom integration: Connecting to Salesforce/Hubspot means building one type of integration, accessing Google Drive requires another, and pulling data from your internal database needs yet another approach.
This creates a fragmented ecosystem where Agents are limited by the specific integrations they were built with. The bigger issue is that these custom integrations are often brittle and hard to maintain once the API call increases. When a service updates its API, you need to update your Agent and tool again. Or, when you want to add a new data source, you’re back to building another custom integration from scratch.
This approach doesn’t scale well, especially for businesses that need their AI Agents to work with dozens of different systems. This means you end up with multiple specialized Agents instead of one comprehensive assistant who can see the full picture of your business operations.
Model Context Protocol addresses these challenges by providing a standardized way for AI Agents to communicate with external services. Instead of building point-to-point integrations, MCP creates a universal language that any compatible Agent can use to access any compatible service. This means your Agent can seamlessly work with your CRM, databases, file systems, and APIs through a single, consistent interface.
In our previous article, we explained how MCP works and improve your coding skills; you can read that here: Boost Vibe Coding with MCP Server & GitHub Copilot.
Understanding the MCP - Transport Mechanism
As MCP is mainly based on a technique called JSON RPC 2.0 (Remote Procedure Call), it mainly uses two primary transport mechanisms for communication between Agents (Client) and servers.
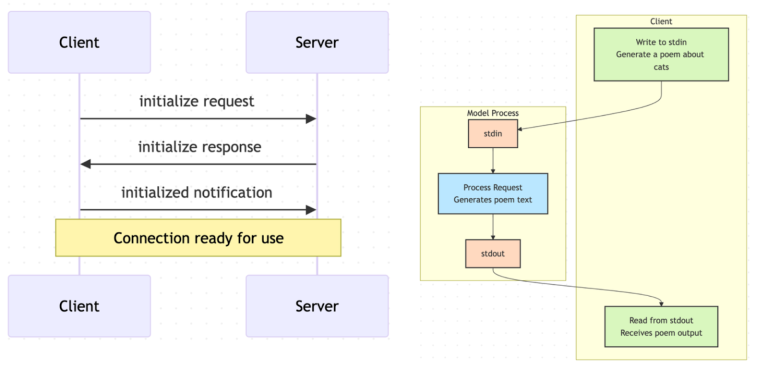
STDIO
Standard Input/Output (STDIO) is the most common transport mechanism for MCP. It works by establishing a direct communication channel between the AI agent and the MCP server through standard input and output streams. This approach is particularly effective for local deployments where the Agent and Server run on the same machine or within the same network environment.
The STDIO transport is ideal for scenarios where you need low latency and high reliability. Since the communication happens through direct process pipes, there’s minimal overhead and maximum security. As for developers, you can easily debug the communication between your Agent and Server by monitoring the input and output streams.
SSE
Server-Sent Events (SSE) transport mechanism enables real-time communication between MCP Agents and Servers over HTTP. Unlike STDIO, SSE allows for remote connections and is particularly useful when your MCP servers are hosted on different machines or in cloud environments.
SSE transport is perfect for scenarios where you need your n8n Agent to connect to remote MCP servers across the internet. This could include connecting to remote API tools, cloud-based databases, SaaS applications, or MCP servers running in different data centers. The HTTP-based nature of SSE makes it firewall-friendly and easier to deploy in enterprise environments where network policies might restrict direct process communication.
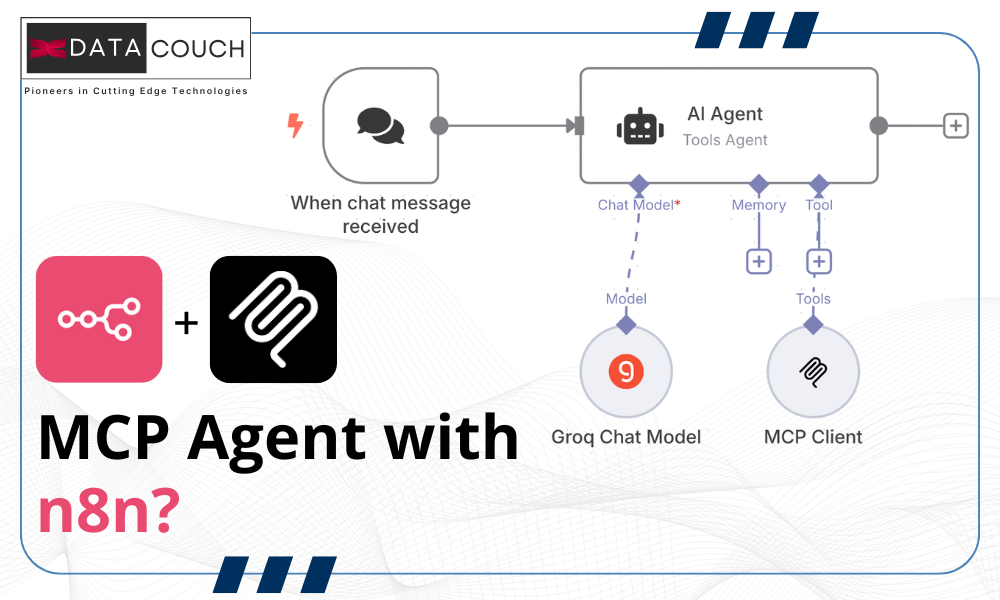
Build your own N8N Agent using the MCP Server
Let’s build an Agent that can answer questions about any website’s content in real time. Think of it as having a research assistant who can instantly read and understand any webpage you point it to and then answer specific questions about that content. Instead of manually browsing through long articles, documentation, or product pages, you’ll simply ask your agent questions like “What are the key features mentioned on this product page?” or “Summarize the main points from this blog post.”
Let’s break down the setup into simple and actionable steps.
Step 1: Create your N8N workflow
To begin building your workflow, start by registering for an n8n Cloud account. Once your account is set, click on “Create Workflow“.
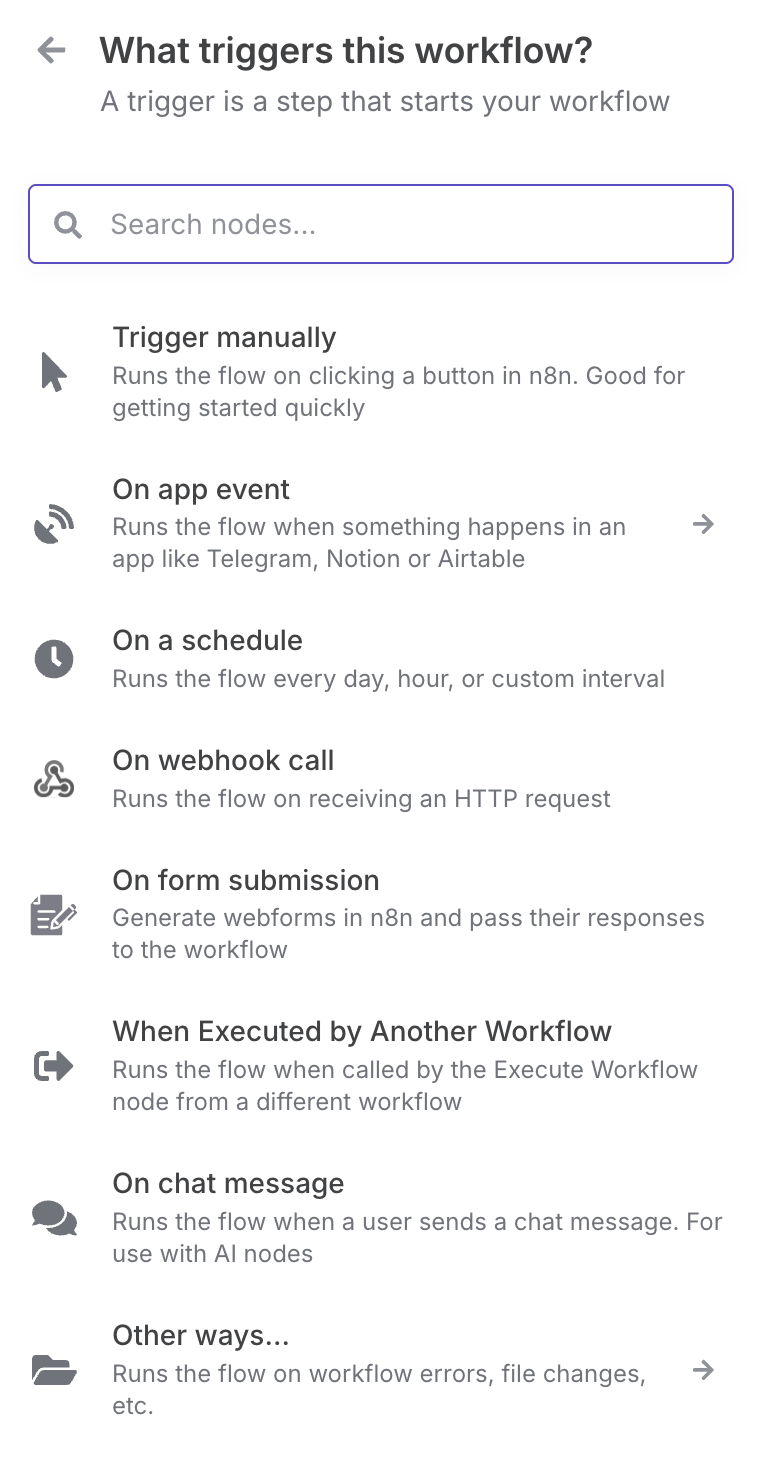
Click on “Add first step” and select “On chat message.” Once selected, configure the settings as needed, including enabling the file upload option if required for execution (this is optional).
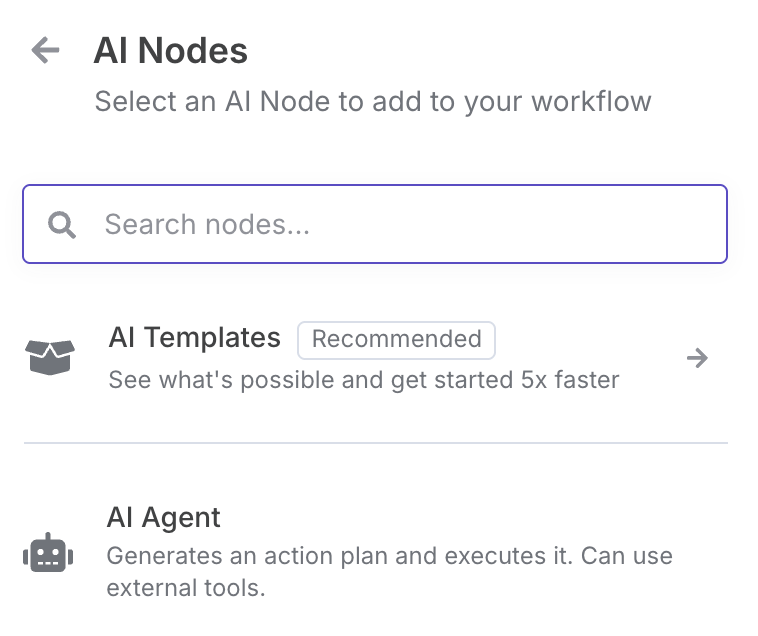
Step 2: Create an AI Agent
Upon selecting AI Agent, choose Conversational Agent since we need a chat-based inference for user interaction. Additionally, you can modify the system message and output format based on your requirements. For now, we will use the default settings.
The key components include Memory, Planning, and Tools. Similarly, for our AI Agent in n8n, we need to connect the Chat Model (where planning happens), Memory, and the tool(s) of our choice to complete the workflow. In this case, the tool is where we connect our MCP Server’s SSE endpoint within the client.
Step 3: Connecting your MCP Client
In the MCP Client, this will act as the tool for the AI Agent. Once you select this tool, you’ll need to add the SSE endpoint where the MCP Server is hosted.
You can find several publicly available MCP Servers here: Awesome MCP Servers GitHub.

Note: Once you configure the MCP Client, don’t forget to enable Active on the Navbar.

Step 4: Building Faster LLM Inference
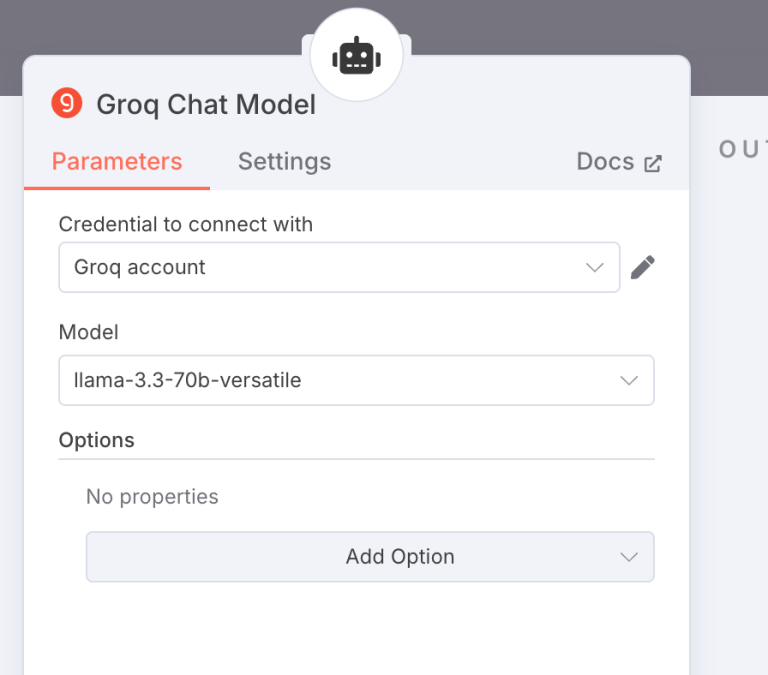
The Large language model is the core part of the Agentic workflow; this is where the decision-making and the action selection are decided. For the chat model, we will be using Groq LLM. Groq is designed specifically for generating code or function calls, and its architecture is optimized for speed and efficiency. While LLM models like Gemini or GPT might be generating 100-200 tokens per second, the Groq AI chip delivers close to 1000-2000 tokens per second.
In order to use the Groq Chat Model, you need to create the “Credential to connect with” and add the API key. Get your API key from here: https://console.groq.com/.
Once you add the API key, you can select the model from the dropdown list. It mainly supports the higher benchmarked open source models like Llama, DeepSeek, Mistral, and Qwen.
Step 5: Executing the Agent
Once the tool and chat model are configured, we just need to connect it with the AI Agent instance.

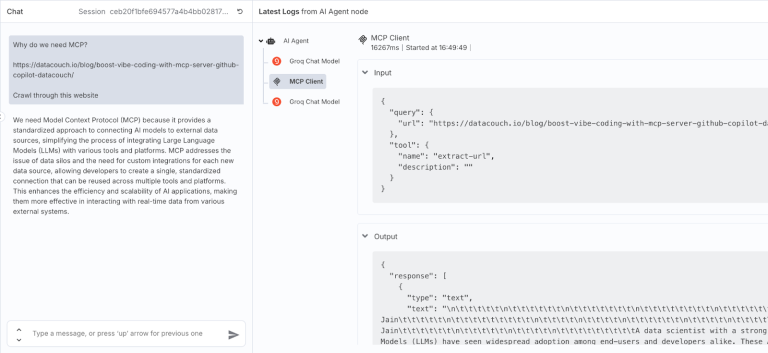
Step 6: Output- Notice how the Agent triggers MCP
Once the user asks a question, the Agent first decides which function to call. After selecting the function, the MCP Client is triggered to fetch the right context. In this example, I’m using one of our previous blogs, Boost Vibe Coding with MCP Server & GitHub Copilot, and asking a question based on that blog.
After the tool call is completed, the LLM generates the final response. That’s why you’ll observe two LLM calls and one tool execution in the output flow.
Final Words
We’ve completed our MCP agent. It’s essential to use MCP when working with agentic and LLM-based applications. With the latest updates on AI agents from Google I/O and other major conferences, one thing is clear: workflow implementation is moving towards modular, protocol-based architectures. By understanding these fundamentals and integrating them into existing tools, you can achieve more accurate and efficient responses. In the next article, we’ll share how to use the A2A (Agent-to-Agent) protocol for communication.
FAQ’s
1. What is MCP (Model Context Protocol)?
MCP is a standard, open protocol that allows AI Agents to link with external tools and data sources through a unified, scalable interface. It acts as a universal connector, like the USB C-type port, allowing your AI applications to access data from diverse sources, regardless of their location or architecture.
2. Why use n8n for building an MCP Agent?
n8n lets you build flexible and end-to-end no-code workflows with ease, enabling you to connect AI Agents with MCP servers without writing any custom code.
3. What transport methods does MCP support?
MCP supports STDIO (Standard Input/Output) for local deployments and HTTP+SSE (Server-Sent Events) for real-time communication with remote or cloud-hosted servers.
4. How does the MCP Agent fetch website content insights?
The AI agent leveraging MCP connects via SSE to an MCP Server, reads the webpage, and uses an LLM to summarize or respond to questions based on the content.
5. Which LLM is used in this tutorial for faster inference?
Groq LLM is used for its high-speed performance, generating up to 2000 tokens per second, which is ideal for real-time agentic workflows.