In a world where time is scarce and interruptions are constant, the way we work is ripe for transformation. According to Microsoft’s latest Work Trend Index, 80% of professionals globally say they lack the time or energy to do their jobs effectively. With an average of 275 interruptions per day – including 58 chats after hours and a 16% annual increase in late-night meetings – it’s no wonder productivity is under pressure.
Yet, while the pace of business and technology accelerates, our workflows often lag behind. Even with AI tools in place, 53% of global leaders believe their organizations need a productivity boost. So, how do we bridge this gap?
The answer lies in intelligent delegation – aka AI agents.
Learning Objective
- What the Model Context Protocol is and why it matters for AI development
- Learn how MCP’s client-server architecture works in practice
- The three core features that make MCP servers powerful: Tools, Prompts, and Resources
- Understand why MCP might be the missing piece in your AI Agent workflow.
- Implement your own MCP Client and MCP server from scratch using just Python.
What is Model Context Protocol?
Building an AI assistant for your company sounds straightforward until you need it to access real data. Want it to pull CRM information, check Slack messages, verify calendar availability, and search internal docs? That means creating separate custom integrations for Salesforce, Slack API, Google Calendar, and your document system. Each follows different patterns, error handling, and authentication methods, turning what should be simple connections into a maintenance nightmare.
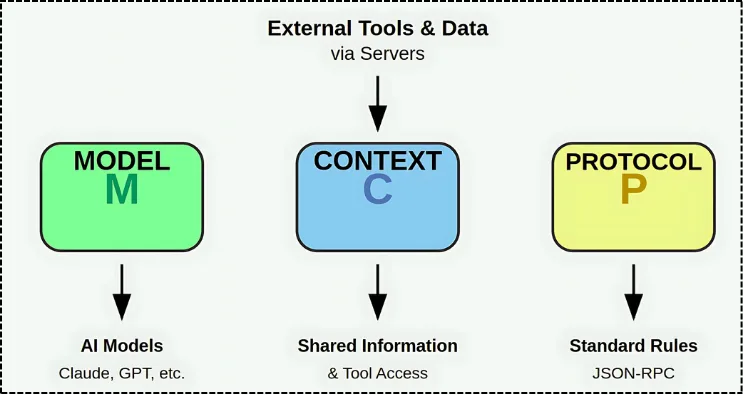
This is exactly the problem the Model Context Protocol (MCP) is trying to solve. It was developed by the Anthropic team. MCP provides a standardized way to connect AI models with external resources, similar to how USB-C standardized device connections. Instead of building unique bridges, i.e., custom integrations each time, you create or use MCP servers that follow the same protocol rules. If someone builds an MCP server for GitHub, any MCP-compatible client can use it without custom integration work.
In simple words, as the name suggests, MCP: Provide additional CONTEXT to the MODEL, i.e., LLM or Agentic workflow in standardized rules, i.e., PROTOCOL.
Client-Server interaction: How does the MCP work?
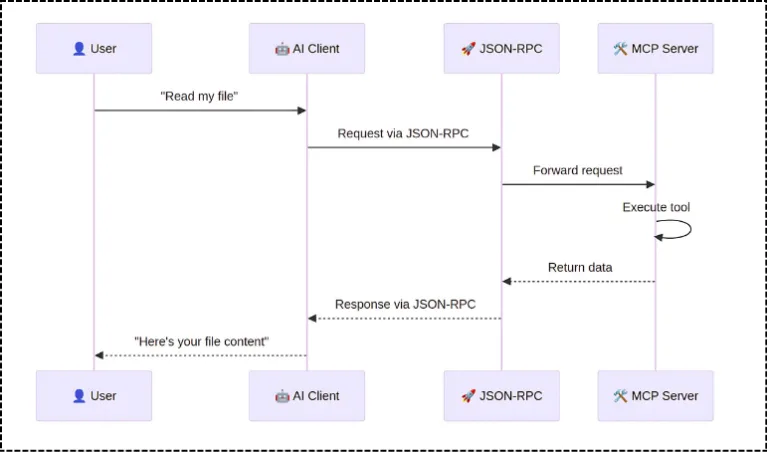
The MCP architecture is straightforward but powerful. It consists of four main components: Host, Client, Transport layer, and Server. Let’s understand how they work together.
MCP Clients live inside your host environment, e.g., Claude Desktop, Cursor, VS Code, or any AI application you’re building. These clients act as messengers, sending requests for additional context or asking servers to perform actions.
MCP Servers is where the core logic is implemented that fetches the context. MCP Server can share resources (files, docs, data), expose tools (API integrations, actions), and provide prompts (templated interactions). They control their resources and maintain clear system boundaries for security. In simple words, it’s like APIs of API.
The Transport Layer handles communication between clients and servers. There are two main transport mechanisms:
- STDIO (Standard Input/Output): Lightweight and used when the client and server are on the same system. This is the default transport layer in MCP.
- SSE (Server-Sent Events): Used for web-based communication, ensuring continuous, real-time data exchange between remote clients and servers.
- In some examples or docs, you will notice an HTTP-based transport mechanism as well, which is mostly similar to SSE.
Communication happens through JSON-RPC 2.0, ensuring everything follows a standardized message format. And as per the recent release, Anthropic also made multiple enhancements, including OAuth 2.1 to secure Agent-server communication and Streamable HTTP Transport.
What Are the Core Capabilities of an MCP Server?
MCP servers offer three main capabilities, i.e., Tools, Prompts, and Resources.
Tools let the Agents or LLM take actions. Send emails, create calendar events, update CRM records, or run database queries. Tools have side effects and can modify data. The tools are where the actual logic is written that defines what functionality needs to be performed based on the user query.
Prompts are reusable templates that keep AI interactions consistent. Instead of hoping your AI formats responses correctly each time, you define the pattern once. Whether it’s code reviews checking for security issues, support templates collecting customer information, or meeting summaries capturing key decisions, prompts ensure your AI follows the same structure every time.
Resources are read‑only data sources your AI can access, such as company docs in Notion, support tickets from Zendesk, or meeting transcripts. They provide information to the AI without making any changes to your systems.
Build your own MCP Server and MCP Client
Step 1: Initial installation
As the Prerequisites, you need to have uv installed on your system. Install it using:
Then, initialize your project with uv:
Step 2: Dependency Local Setup
Install the required dependencies for our search MCP server. We’re adding web search capabilities, location data handling, and AI model integration for our MCP implementation.
Step 3: Build your own MCP Server - Search feature
Create a simple MCP server that provides web search functionality. The server exposes a search tool that takes a user query, performs a Google search with configurable parameters like result count and language, then aggregates the search result descriptions into a single context string
Note: When defining any tool, it is important to specify two things. First, define the data type for the function (i.e., str in our case). Second, add context in the Python docstring to explain when this tool should be used.
This foundational implementation demonstrates how to wrap external APIs as MCP tools, making web search capabilities available to any MCP-compatible client. Let’s test it out. Lets keep the transport mechanism as stdio, since we are running it locally.
Step 4: Bonus: Test your tool on the MCP Server UI- MCP Inspector
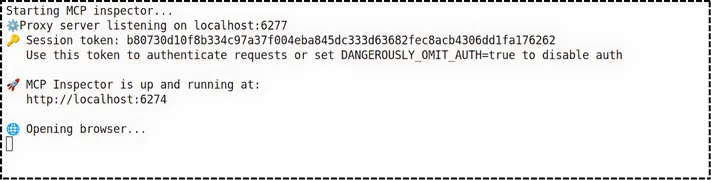
In order to test the MCP server tool, let’s execute and test it on the development server UI, i.e., MCP Inspector running on localhost. Assuming the above code is saved in server.py, here is how you run the UI on a browser:
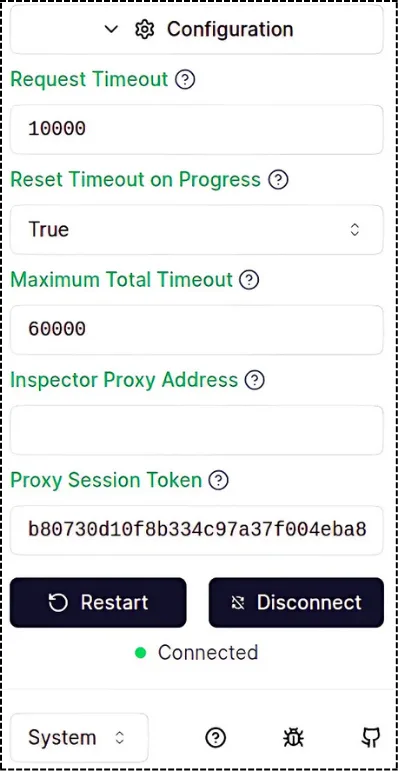
Important: In Figure 3, each time you run the code, you get a temporary Session token. Copy this token, go to localhost, open the sidebar, select Configuration, and paste it under Proxy Session Token. It’s temporary, so if you close and open again, you’ll get a new token. Once you add the token, click on Connect.
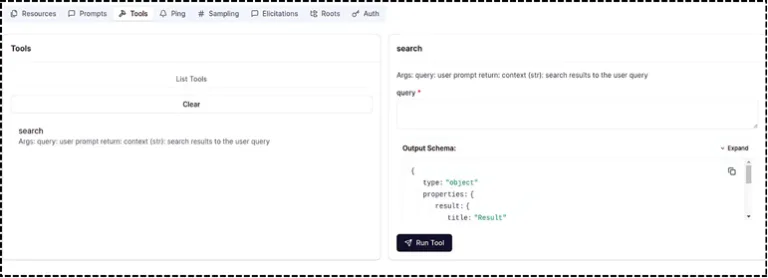
Now, as mentioned earlier, the MCP server has 3 components: tools, resources, and prompt. Let’s test the too, i.e., the search. Click on tools.
Once you click on Tools, select List Tools. Based on the script, it will display all tool names as clickable buttons for testing.
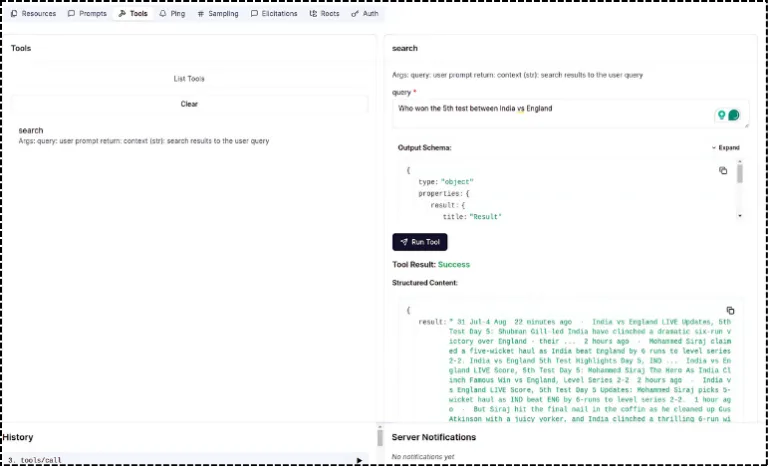
As per Figure 6, once you click on search, you will notice the testing UI where you can enter any real-time user query.
Step 5: Build your own MCP Client
Alright, now that we know the tool is working well, we proceed and develop the MCP Client, where you need to use LLM to process queries.
The LLM we will use here is OpenAI’s GPT-4o-mini, you can get your API key from OpenAI Platform.
I will breakdown the MCP Client logic into 3 sub-parts, just make sure all the 3 parts is under just one class i.e., MCPClient.
Step 5.1: Connect to the Server
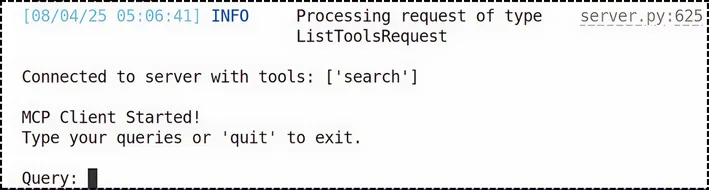
The MCPClient class initializes with an OpenAI client and manages server connections through an async exit stack for proper resource cleanup. The transport mechanism defined in the MCP server was stdio, so lets establish a stdio transport connection to the MCP server, initializes the session, and retrieves available tools for use.
Step 5.2: Process your query
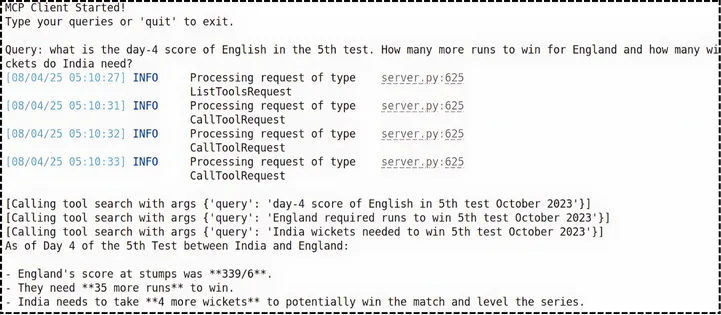
The client sends the user query to OpenAI along with available MCP tools, then executes any requested tool calls through the session and appends results to the conversation.
Once the LLM choose tool, tool generates the response, then we use one more LLM call to generate the final response which takes this tool response as context.
Now lets create an interactive chat interface that continuously processes user queries until ‘quit’ is entered, with proper resource cleanup through the exit stack when the session ends.
Puting the entire MCPClient class together
Step 6: Execute the MCP Client
Now we set up the main function to run the complete MCP client application.
Execute the code, assuming the file name is client.py. Make sure server.py and client.py in same directory, if in different directory modify the path accordingly.
Stand proud, you just built your own MCP Client and MCP server.
Wrap Up
For now, if you’re building AI applications that need external data access, MCP is worth exploring. Even if it doesn’t become the universal standard, the patterns and concepts it introduces will make you a better AI developer. And who knows? You might just be working with the USB-C of AI protocols, as data never lies in one place in the real-time setup.
FAQs
- What is the Model Context Protocol (MCP)?
MCP is a standardized way to connect AI models with external tools, APIs, and data sources, enabling context-aware AI applications.
- Why should I use MCP instead of custom APIs?
MCP eliminates the need for one-off integrations by offering a plug-and-play protocol that works across different systems and AI clients.
- Can I build an MCP server with just Python?
Yes, you can build a fully functional MCP server and client using Python, without any heavy frameworks.
- What kind of tools can I expose via an MCP server?
You can expose tools like Google search, calendar management, CRM updates, or any API-backed functionality.
- Is MCP compatible with GPT-4 or Claude models?
Yes, MCP is model-agnostic and works with LLMs like GPT-4, Claude, and others that support tool calling or function execution.