Introduction
Analyzing tons of data everyday is a very tedious task. Hive is one of the key tools for analysis of Big Data. But there are a lot of issues with this framework including Scalability, Monitoring, Implementing Multi-tenancy, performing right Capacity Planning etc. For solving this problem there are platforms like Snowflake which enable us to focus on getting insights from data rather than dealing with the above issues. It actually provides you an abstracted platform on which you just have to think about queries not about scaling, storage, availability or any other issue. So just enjoy analyzing your data without any worry with Snowflake. Let’s explore Snowflake in detail.
Learning Objectives
- What is Snowflake?
- Architecture of Snowflake
- Snowflake Advantages
- Creating a free account with Snowflake
- Exploring Worksheets in Snowflake
What is Snowflake
Snowflake enables data storage, processing, and analytic solutions that are faster, easier to use, and far more flexible than traditional offerings. Snowflake’s data platform is powered by the advanced data platform which provides Datawarehouse-as-a-Service (DaaS). The Snowflake data platform is not built on any existing database technology or “big data” software platforms such as Hadoop. Instead, Snowflake combines a completely new SQL query engine with an innovative architecture natively designed for the cloud. To the user, Snowflake provides all of the functionalities of an enterprise analytic database, along with many additional special features and unique capabilities.
Architecture of Snowflake
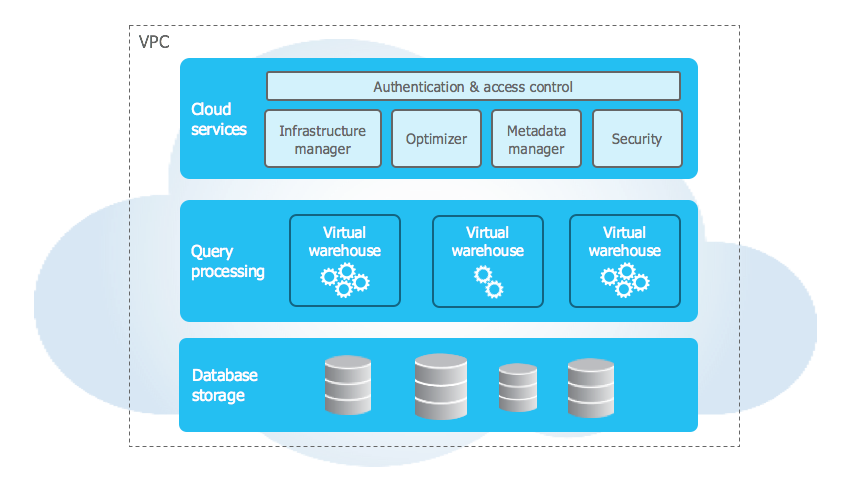
Source: Snowflake
- This architecture is hybrid of traditional shared-disk and shared-nothing database architectures
- It uses a central data repository for persisted data which can be accessed from all compute nodes in the platform which is similar to the shared-disk architectures
- It processes queries using Massive Parallel Processing(MPP) compute clusters for executing the queries which is similar to shared-nothing architecture
- In this approach we get the data management simplicity of a shared-disk architecture, but with the performance and scale-out benefits of a shared-nothing architecture
Snowflake Advantages
- As Snowflake is cloud based data warehouse-as-a-service, we can easily scale up or down, which provide us better speed and performance
- In Snowflake one can easily combine the structural and semi-structural data for analysis purpose without any conversions or transformations
- With the multi-cluster architecture Snowflake provide you the Concurrency and Accessibility from anywhere in the world
- One can also share the data with other Snowflake (even non-Snowflake) users easily. This way organizations can share the data with customers seamlessly
- As it uses AWS, Azure or GCP on its backend. It has great security features inherited from the cloud providers
- Also it is distributed across multiple availability zones so it brings the high availability
Creating a free Account with Snowflake
- Open a browser window and enter the URL of your Snowflake environment e.g. https://trial.snowflake.com/
- Create an account

Enter the details of yours then click on continue.
1. Select the Enterprise Edition, then select the AWS cloud provider and select the region US East and after completing all the details click on Get Started.

Note: An email to activate your account has been sent to your given email id (it may take a few minutes to arrive).
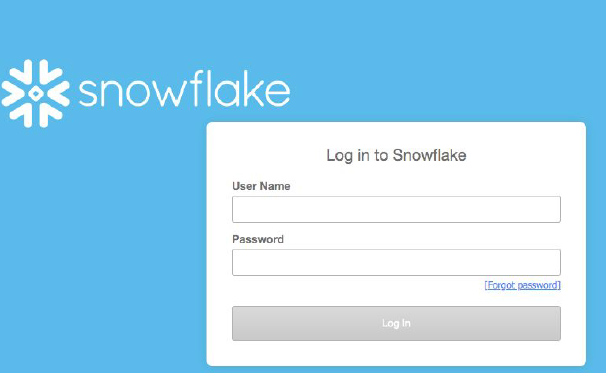
2. You should see the login screen below. Enter your unique credentials to log in .
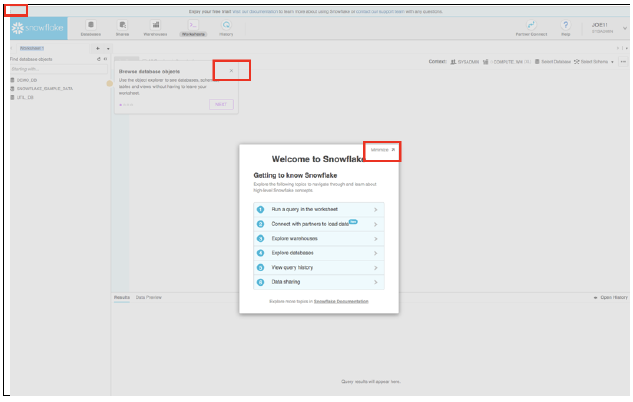
Close any Welcome Boxes and Tutorials
3. You may see “welcome” and “helper” boxes in the UI when you log in for the first time. Also a “Enjoy your free trial…” ribbon at the top of the UI. Minimize and close them by clicking on the items in the red boxes on the screenshot below.
Navigating the Snowflake UI
First let’s get comfortable with Snowflake! Let’s discuss basic components of the user interface. We will move left to right at the top of the UI.
1. The top most menu allows you for switching between the various areas of Snowflake:

2. The Databases tab displays the information about the databases the user has created or has privileges for accessing. One can also create, clone, drop, or transfer the ownership of databases as well as data loaded (limited) in the UI. When you move to this tab then you would notice several databases already exist in your environment.

3. The Shares tab is the place where users can configure the data sharing easily and securely shared Snowflake table(s) among various Snowflake accounts or other external users, without creating the second copy of data in the table.
4. The Warehouses tab is the place where users can set up and manage the various compute resources (virtual warehouses) for loading or querying the data in Snowflake.
Note: Warehouse called “COMPUTE_WH (XL)” already exists in your environment.

5. The Worksheets tab provides an interface to the users for submitting SQL queries, performing DDL & DML operations and also viewing the results as user’s queries or operations complete. The default worksheet named as “Worksheet 1” will appear to all the users.
6. In the left pane, users can see the database objects browser which enables the users for exploring all the databases, schemas, tables, and views accessible by the user role selected for that particular worksheet. The bottom pane of the page shows the results of various queries and operations executed in the worksheet.
7. Users can resize the various windows on this page by moving the small sliders on the page. And if anyone needs more room for working in the worksheet, collapse the database objects browser from the left pane.

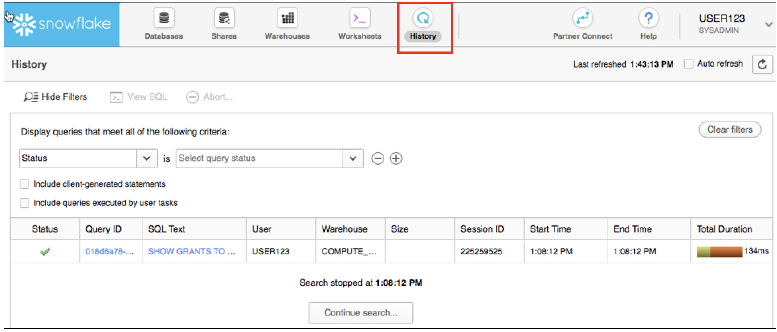
8. The History tab allows users for viewing the details of all the queries executed in the previous 14 days in the User’s Snowflake account (one can click on a Query ID for drilling into the query for more detail).
9. If a user clicks on the top right of the UI where the user name appears, one can see that users can do various things like changing password, roles, or preferences. Snowflake has various system defined roles. By default the role is set as SYSADMIN.

Exploring Worksheets in Snowflake
The Worksheets 
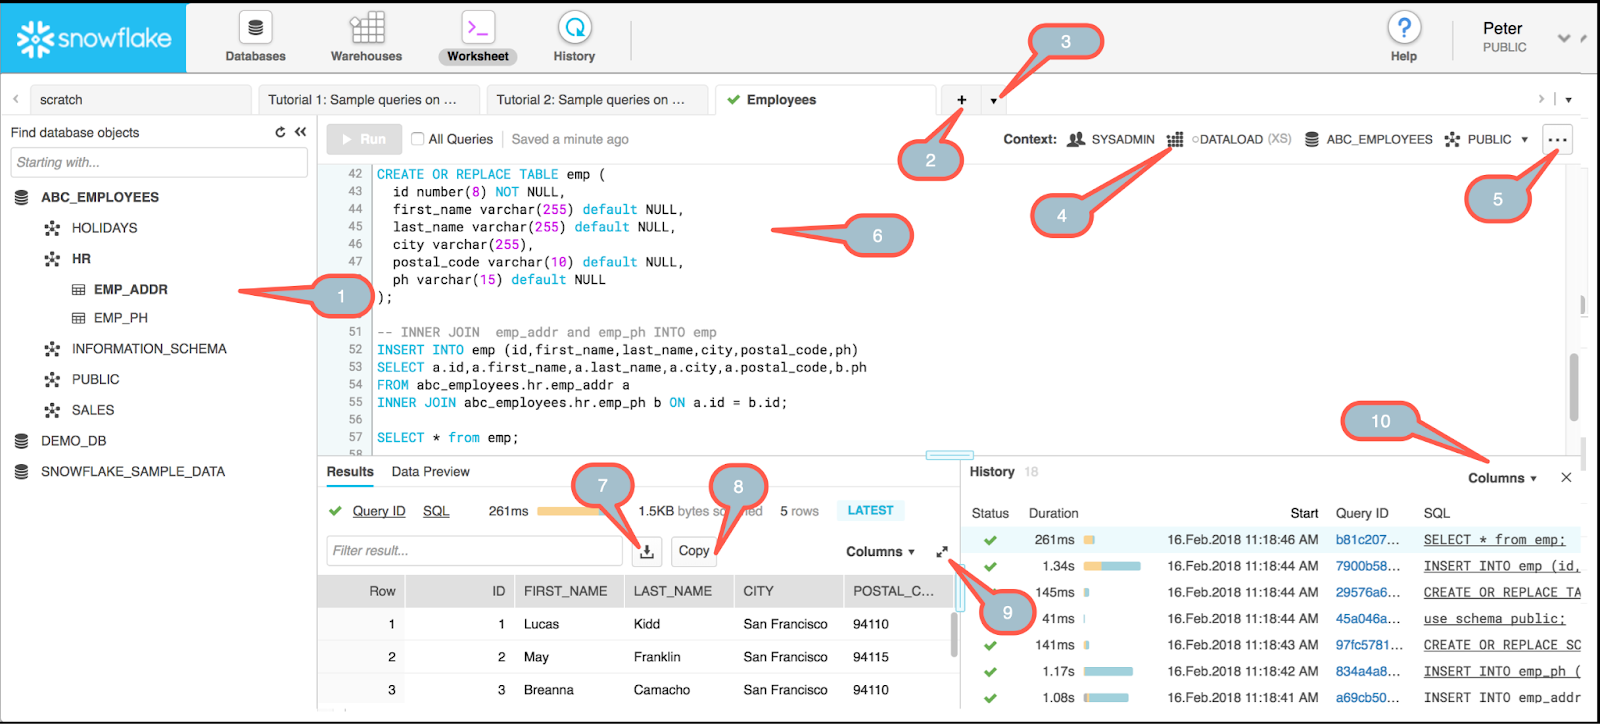
- Object browser
- Add a worksheet
- Dropdown menu:
- Manage worksheets (search for, open or delete, rename)
- Open a tutorial
- Load a script
- Dropdown menu:
- Change the current database, schema, or warehouse for the current worksheet without losing your work
- Resume/suspend or resize your current warehouse
- Dropdown menu:
- Load a script
- Enable/disable text highlighting
- Show/hide Run confirmation
- Delete the current worksheet
- SQL editor
- Download Results
- Copy results to clipboard
- Maximize/restore results
- Hide or show columns
Source – https://docs.snowflake.com/en/user-guide/ui-worksh…
Conclusion
Snowflake is the data warehouse which is provided as Software-as-Service (SaaS) by using various cloud providers in the background such as AWS, GCP or Azure. It lets you forget about the data silos and focuses on the analytical part only. It automatically takes care about availability, security or storage problems.
Additional Resources
Here are some of our additional resources which would help you to explore more about Snowflake.


