
Tarun Jain
A data scientist with a strong focus in AI/ML, this individual is recognized as a Google Developer Expert and actively contributes to the open-source community.
LangGraph Quickstart: Ultimate tutorial for LangGraph
Building AI agents isn’t just about linking a few APIs. If you’ve tried it, you know how hard it gets when the agent needs to reason, make decisions, or handle complex workflows. Most traditional setups break down with multi-step tasks, can’t recover from errors well, and lose context fast. That’s exactly where LangGraph fits in.
In this guided article, let’s break down what LangGraph is, when you should use it, and how its core components work together to create AI workflows. We’ll also explore how to build ReAct Agent and RAG pipelines using LangGraph to interact with internal data.
Want to build powerful generative AI workflows?
Check out our hands-on course: Building Generative AI Apps with LangChain perfect for mastering LangChain and prepping you for LangGraph workflows.
What is LangGraph?
LangGraph is a framework built on top of LangChain that helps you design stateful, multi-agent workflows using a graph-based structure. It’s like giving your AI the power to think in loops, make decisions, and even retry when something fails.
Instead of building basic, linear chatbots, you can now create Agents that handle real-world logic and complex tasks. In simple words, traditional LLM apps follow a straight path: input → process → output. But real scenarios aren’t that linear. You often need your AI to dig deeper, research, assess results, ask follow-ups, and refine its answers. LangGraph makes that possible.
The framework treats each AI operation as a “node” in a graph, and these nodes are connected by “edges” that determine the flow of execution. This graph-based approach makes it easier to visualize, debug, and modify complex AI workflows compared to traditional linear approaches.
When to use LangGraph?
When it comes to building LLM-based applications like RAG and Agents workflows, at the right moment, we have multiple frameworks to work with. One always has questions about which framework to use for the given user task.
Based on the experimentations, usage, LangGraph is well-suited:
- Human-in-the-loop workflows work well with LangGraph wrapper integrations. Sometimes you need AI to do the heavy lifting, but want human oversight at critical decision points. LangGraph makes it easy to pause execution, get human input, and continue processing based on that feedback.
- Multi-step reasoning tasks are perfect for LangGraph. If your AI needs to break down complex problems into smaller steps, evaluate intermediate results, and adjust its approach based on findings, LangGraph provides the structure to handle this via state management.
- Error recovery and retry logic become crucial when your AI agents interact with external APIs or databases.
- LangGraph’s stateful nature means your agents can detect failures, try alternative approaches, and resume from where they left off rather than starting over completely.
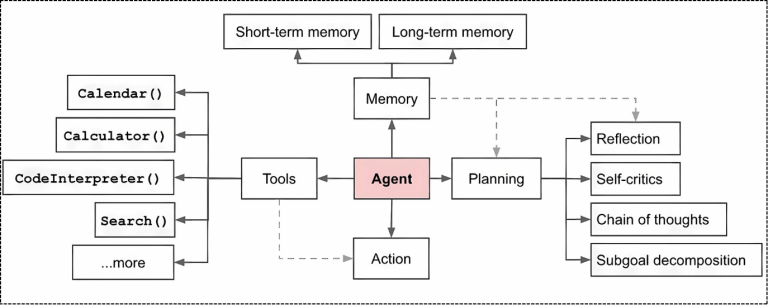
Core LangGraph components
Installation
!pip install langgraph
!pip install langchain langchain-community
Large Language Models
Large Language Models are the decision-making engines in your LangGraph workflows. Unlike traditional applications, where you write explicit if-else logic, LLMs provide the reasoning capability that determines what your agents should do next.
There are two ways we can initialize LLM chat models in the LangGraph.
- By using the specific wrapper and installing via pip. Let’s consider Gemini LLM. The provider for the Gemini LLM is Google GenAI. You can get your API key from AI Studio.
Install: pip install langchain-google-genai
import os
from langchain_google_genai import ChatGoogleGenerativeAI
os.environ[‘GOOGLE_API_KEY’] = “replace-with-your-api-key”
llm = ChatGoogleGenerativeAI(
model=“gemini-2.5-flash”,
temperature=0,
)
- Using Langchain’s init chat model function
from langchain.chat_models import init_chat_model
llm = init_chat_model(
“google_genai:gemini-2.5-flash”,
temperature=0
)
Note: In both approaches, the model used is Gemini 2.5 Flash, and the API keys need to be stored in the environment.
Custom Tool building
When building agents, one key component is Tools. Based on the user’s task, the agent decides which Action to take and selects the right tool to execute it. In our case, let’s create a custom search tool that uses Google Search via a web browser based on the user’s query.
Two things to keep in mind while developing a custom tool:
- Add a docstring under the function to describe what it does. This gives the Agent more context to correctly choose the tool when deciding on an action.
- Define the return data type in the function type extension.
Installation: !pip install pycountry googlesearch-python
from googlesearch import search
def web_search(query:str) -> str: # here -> str is the data type
“””
Args:
query: user prompt
return:
context (str): search results for the user query
“””
max_results = 10
language = “en”
results = search(query, num_results=max_results, lang=language, advanced=True)
context = “”
for result in results:
context += result.description
return context
Still mastering LangChain basics?
Start with our foundational course: Generative AI for Developers (Level 1) before diving deeper into LangGraph complexities
LangGraph Prebuilt Agent: ReAct Agent
While building custom LangGraph workflows gives you complete control, sometimes you need to get up and running quickly without reinventing the wheel. That’s where LangGraph’s prebuilt agents come in, and the ReAct Agent is probably the most useful one for most business scenarios.
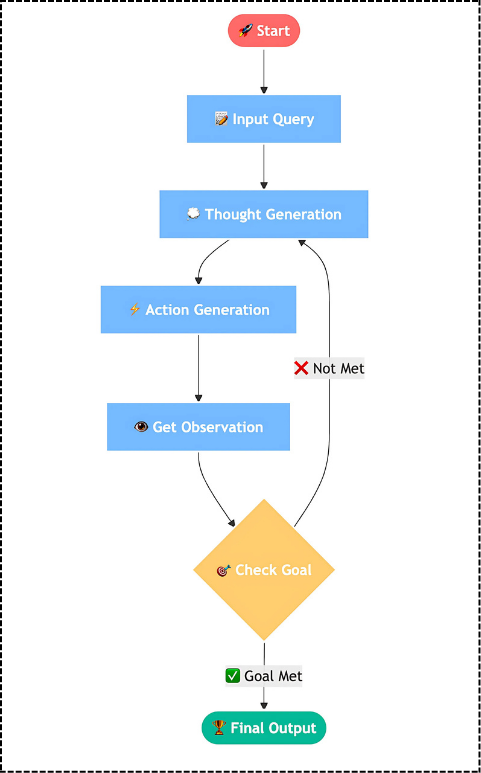
ReAct agent is an AI Agent that uses the “reasoning and acting” (ReAct) framework to combine chain of thought (CoT) reasoning with external tool use. Think of ReAct as giving your AI the ability to think out loud while taking actions. Instead of just generating a response, the Agent can reason about what it needs to do, take specific actions to gather information, evaluate the results, and then continue reasoning based on what it discovered.
LangGraph provides a prebuilt create_react_agent function that simplifies the setup process. The best part of using the prebuilt agent is that you get all the React logic without having to implement the reasoning-action cycle yourself.
So far, we’ve defined the LLM model and the custom search tool. Now, we’ll pass them to the create_react_agent and ask the Agent a real-time query.
from langgraph.prebuilt import create_react_agent
agent = create_react_agent(
model=llm,
tools=[web_search],
)
response = agent.invoke(
{“messages”: [{“role”: “user”, “content”: “Boeing 787 Dreamliner latest news”}]}
)
print(response[‘messages’][3].content)

Why are we using response[‘messages’][3].content instead of just print(response)? Because the LLM structures the response as a series of messages:
- messages[0] is the user prompt (e.g., “Boeing 787 Dreamliner latest news”)
- messages[1] is the function call (web search)
- messages[2] is the function response
- messages[3] is the final AI-generated answer
So, we extract message[3].content to get the actual response from the agent.
Structured Responses
Now what if you want the response directly from the LLM without all this index filtering? LangGraph’s ReAct agent supports structured outputs using Pydantic models, which ensures your agent returns data in a consistent, predictable format rather than free-form text.
However, keep in mind that using structured response formats typically requires an additional LLM call to format the final output, which can increase both latency and costs compared to returning plain text responses.
from pydantic import BaseModel
class SearchResponse(BaseModel):
results: str
agent = create_react_agent(
model=llm,
tools=[web_search],
response_format=SearchResponse # takes additional LLM call
)
response = agent.invoke(
{“messages”: [{“role”: “user”, “content”: “Boeing 787 Dreamliner latest news”}]}
)
print(response[“structured_response”].results)

Want to build powerful generative AI workflows?
Check out our hands-on course: Building Generative AI Apps with LangChain —perfect for mastering LangChain and prepping you for LangGraph workflows.
What are State, Node, and Edge?
Before we build the RAG pipeline to chat with your internal data, understanding State, Node, and Edge is crucial for building effective LangGraph workflows. These three concepts form the core architecture that makes LangGraph powerful and flexible.
State
LangGraph introduces the concept of an agent state shared among all the nodes and edges in a workflow. This allows automatic error recovery, enabling the workflow to resume where it left off.
Think of State as the memory of your workflow. It’s a data structure that travels through your graph, carrying information from one node to another. Unlike traditional functions that only see their input parameters, every node in LangGraph can access and modify this shared state.
Node
In LangGraph, each node represents an LLM agent, and nodes represent actions that your graph can take, such as calling a function or processing data in some specific way. In simple words, it’s a Python function that does something.
Nodes are the working units of your LangGraph workflow. Each node performs a specific task and then updates the shared state with its results. This approach is that nodes are modular and reusable, you can build a library of nodes for common tasks and combine them in different ways.
Edge
Edges define the connections between nodes, determining the flow of execution within the graph. They specify how the output of one node is passed as input to another node. Edges can be normal (directly connecting one node to another) or conditional (routing to different nodes based on conditions).
Edges can also include validation logic, ensuring that certain conditions are met before proceeding to the next node. This prevents workflows from continuing with invalid or incomplete data.
Ready for advanced RAG and NLP applications?
Dive deeper with our Generative AI NLP Specialization (Level 4) —build production-grade RAG pipelines, complex LangChain/LangGraph integrations, and more!
Simple Chatbot using LangGraph
To understand State, Node, and Edges better, let’s build a simple chatbot using the Gemini LLM we defined earlier to respond to user messages.
The State class keeps track of the conversation history using an annotated messages list. The chatbot function then sends this history to the LLM for generating a response.
from typing import Annotated
from typing_extensions import TypedDict
from langgraph.graph import StateGraph, START, END
from langgraph.graph.message import add_messages
class State(TypedDict):
messages: Annotated[list, add_messages]
def chatbot(state: State):
return {“messages”: [llm.invoke(state[“messages”])]}
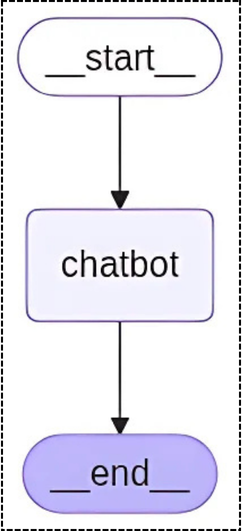
The StateGraph sets up a simple workflow: START → chatbot node → END, showing how even complex conversational AI can be built using LangGraph’s node-and-edge structure.
The add_messages annotation takes care of message tracking, so you can focus on the conversation logic instead of managing history manually. Once done, compile the graph.
graph_builder = StateGraph(State)
graph_builder.add_node(“chatbot”, chatbot)
graph_builder.add_edge(START, “chatbot”)
graph_builder.add_edge(“chatbot”, END)
graph = graph_builder.compile()
response = graph.invoke({“messages”:“hello”})
print(response[‘messages’][1].content)
Now, it’s time to build a Chatbot using the Retrieval Augmented Generation workflow. If you are not sure of what RAG is, you can check our previous article on: No-Code RAG Workflow with n8n. Build Your Own AI Data Chatbot.
Ready to level up from LangChain to LangGraph?
Gain the skills you need with our practical course, Building Generative AI Apps with LangChain. Hands-on labs, expert guidance, and real-world projects await!
Build RAG workflow using LangGraph
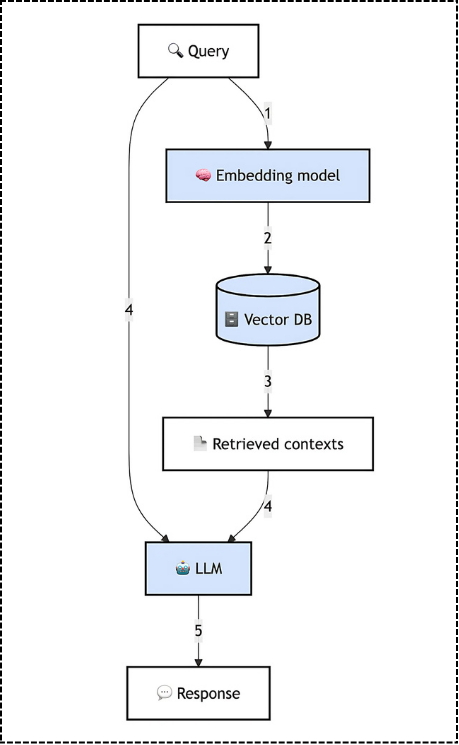
The basic RAG pipeline involves embedding a user query, retrieving relevant documents to the query, and passing the documents to an LLM for the generation of an answer grounded in the retrieved context. In practice, many have found that implementing RAG requires logical reasoning around these steps.
In this demo, we’ll build a Customer Service chatbot using Shopify’s FAQ docs, making it respond like a real support assistant.
Installation
!pip install langgraph
!pip install langchain langchain-community
!pip install fastembed langchain-qdrant
!pip install langchain-google-genai
We’ll use Qdrant as the vector database and FastEmbed to convert text into embeddings. FastEmbed runs on ONNX and is lightweight yet fast compared to other open-source options. Since our data is an FAQ webpage, we’ll load it using Langchain’s WebBaseLoader and chunk it to handle context window limits. Saving to the vector database is a one-time step, often called offline document processing.
from langchain_community.document_loaders.web_base import WebBaseLoader
from langchain_text_splitters import RecursiveCharacterTextSplitter
from langchain_community.embeddings.fastembed import FastEmbedEmbeddings
from langchain_qdrant import QdrantVectorStore
Step 1: Offline document processing
Let’s load Shopify’s FAQ page, split it into 1000-character chunks, and embed them using FastEmbed’s GTE-large model. This makes the content searchable for LangGraph to retrieve relevant information during the retrieval step. Here, the FastEmbed embeddings will load the model files locally, which is a one-time process.
# load raw data
loader = WebBaseLoader(“https://www.shopify.com/in/faq”)
documents = loader.load()
# chunk your data
text_splitter = RecursiveCharacterTextSplitter(chunk_size=1000, chunk_overlap=0)
chunks = text_splitter.split_documents(documents)
# Initialize the embedding model
embeddings = FastEmbedEmbeddings(model_name=“thenlper/gte-large”)
Step 2: Index data to the Vector database
We connect to Qdrant, create a collection with 1024-dim vectors using cosine distance, and store our embedded chunks. To get the URL and API_KEY, create a free cluster on Qdrant Cloud.
from qdrant_client.models import Distance, VectorParams, models
from qdrant_client import QdrantClient
collection_name = “langgraph”
client = QdrantClient(
prefer_grpc=True, url = “replace-with-your-url”, api_key= “replace-with-your-key”
)
client.create_collection(
collection_name=collection_name,
vectors_config=models.VectorParams(size=1024,
distance=models.Distance.COSINE,
on_disk=True)
)
vector_store = QdrantVectorStore(
client=client,
collection_name=collection_name,
embedding=embeddings,
)
vector_store.add_documents(chunks)
Step 3: Define your LangGraph State and System Prompt
Now that the data is saved in the vector DB, we’ve completed the Retriever part of RAG. Next, it’s time to augment the user query. The prompt is simple: If the answer exists in the context, return it. If not, just say “I don’t know.”
We’ll pass two inputs to the prompt: the retrieved context and the user question. We need to use LangGraph’s state to manage them.
from typing_extensions import List, TypedDict
from langchain_core.documents import Document
class RAGState(TypedDict):
question: str
context: List[Document]
answer: str
SYSTEM_TEMPLATE = “””
You are an expert QA Assistant who answers questions using only the provided context as your source of information.
If the question is not from the provided context, say `I don’t know. Not enough information received.`
“””
HUMAN_TEMPLATE = “””
We have provided context information below.
CONTEXT: {context_str}
———————
Given this information, please answer the question: {query}
———————
If the question is not from the provided context, say `I don’t know. Not enough information received.`
“””
Ready for advanced RAG and NLP applications?
Dive deeper with our Generative AI NLP Specialization (Level 4) —build production-grade RAG pipelines, complex LangChain/LangGraph integrations, and more!
Step 4: Search the node using VectorDB as the retriever
As mentioned in the node setup, each LangGraph workflow needs working units. In our case, the search function acts as the first node and handles context extraction from the vector database.
We use max marginal relevance search to fetch the top 4 relevant chunks for the given user query. Max Marginal Relevance (MMR) search balances relevance and diversity to return the most informative and non-redundant results.
def search(state: RAGState):
retriever = vector_store.as_retriever(search_kwargs={“k”:4})
retrieved_docs = vector_store.max_marginal_relevance_search(state[“question”])
return {“context”: retrieved_docs}
Step 5: Generation using LLM
The second node is the generate function. It takes the user’s question along with the retrieved context and passes them to the LLM to generate a final response.
def generate(state: RAGState):
docs_content = “\n\n”.join(doc.page_content for doc in state[“context”])
messages = [
{“role”: “system”, “content”: SYSTEM_TEMPLATE},
{“role”: “user”, “content”: HUMAN_TEMPLATE.format(context_str=docs_content, query=state[“question”])},
]
response = llm.invoke(messages)
return {“answer”: response.content}
Step 6: Compile Graph and run user query
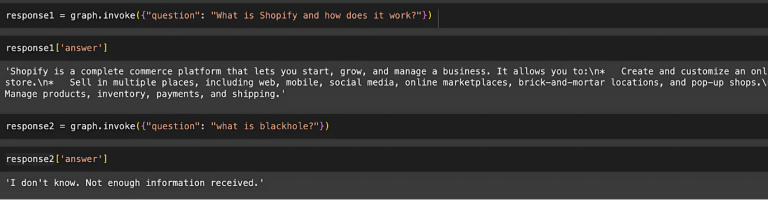
Now that we have two nodes: search and generate, lets build a graph. The flow is straightforward start with search, pass the results to generate, and return the final answer. To test it, we ask two questions: One that exists in the context and one that doesn’t.
graph_node = StateGraph(RAGState).add_sequence([search, generate])
graph_node.add_edge(START, “search”)
graph_node.add_edge(“search”, “generate”)
graph_node.add_edge(“generate”, END)
graph = graph_node.compile()
response1 = graph.invoke({“question”: “What is Shopify and how does it work?”})
print(response1[‘answer’])
response2 = graph.invoke({“question”: “what is blackhole?”})
print(response2[‘answer’])
🎓 Your AI journey doesn't end here!
Enroll today in Building Generative AI Apps with LangChain and master the fundamentals essential for powerful LangGraph workflows.
Final Words
LangGraph solves the real problem of building AI agents that actually work in business scenarios. Instead of fighting with complex integrations and unpredictable workflows, you get a framework that handles the hard parts like state management, error recovery, human-in-a-loop, and multi-step reasoning. In the next article, we will build a Hybrid Search RAG that works well in the production setup.