
Introduction
When it comes to processing, especially Big Data the first name that came to our mind is Spark. Spark is the primary and world widely used distributed processing tool since 2014. As we proceed further, size and amount of data is generated at much higher speed. Our systems don’t have that much capabilities for handling that much data. As we have shifted our on-prem systems to cloud. In case you are looking for a highly scalable and elastic Data Warehouse on cloud with minimal upfront cost and negligible maintenance then Snowflake is one of the best options. Now think of a situation where you can use the best of processing and best of warehousing tools together, for cracking the insights from Big Data. Let’s see this in a pragmatic way and integrate the two technologies.
Learning Objectives
- What is PySpark?
- Advantages of PySpark
- What is Snowflake?
- What is EMR cluster on AWS
- Getting started with EMR cluster on AWS
- PySpark and Snowflake Integration
What is PySpark?
In today’s world we all are dealing with the problem of handling large volumes of data i.e. Big Data. Data is increasing day-by-data, so to handle big data a new data processing computation tool is released, named PySpark.
PySpark is a Unified data processing framework. It is a wrapper over Spark core which is written in Scala. Spark is a distributed processing framework which processes Big data efficiently. It is one of the most popular projects of the Apache Software Foundation, written in Scala. There are multiple libraries available in Spark like ML, SQL, R, Streaming, Graph etc. that help in providing unified solutions to the client.
Advantages of PySpark
- When you use PySpark, you will likely get a high data processing speed of about 10x faster on the disk and 100x faster in memory compared to MapReduce
- Provides Interactive Data Exploration Support
- Quite Matured. Already running in production for so many years now
- Fault Tolerant and Horizontally Scalable
- Real-Time Stream Processing is possible
What is Snowflake?
Snowflake is a cloud based data warehouse (DW) provided as a Software as a Service (SaaS) Platform. It was released in 2012 and was firstly available on AWS. It is used to load and analyse large volumes of data.
Snowflake has its own unique functionalities as compared to traditional data warehouses. It used Massively Parallel Processing architecture to process the queries.
What is Amazon EMR?
Amazon EMR (Elastic MapReduce) is an AWS service which allows us to store and analyse large amounts of data by using various big data frameworks such as Spark, Hadoop, etc. It is easy to use, secure and cost effective.
How To Create an EMR Cluster?
Before to start create a cluster, you should know some basic terms:
- The central component of Amazon EMR is the Cluster.
- A Cluster is a collection of Amazon Elastic Compute Cloud (Amazon EC2) instances and each instance in a cluster is called Node.
- Each node in the cluster has its particular role, called a node type.
Getting started with EMR cluster on AWS
Create your key
LogIn to your Amazon Account and Click on Services then click on EC2
Scroll down and click on Key Pairs, Inside Key pairs click on “Create Key pair”
Enter key pair name and the choose file format then click on Create Key Pair
Go to Amazon web console and search for EMR.
Create EMR cluster
Go to advanced options
After creating the cluster, we have to go to advanced options.
Software configuration
In advanced settings, we have to choose software on which we will work.
Hardware
After setting Software configuration, we have to choose nodes i.e; master and core depending on purchasing option.
1. Master Node
Every Cluster has a Master Node. The master node tracks the status of tasks and monitors the health of the cluster.
2. Core Node
Core node with software components that run tasks and store data in the Hadoop Distributed File System (HDFS) on your cluster.
In the hardware section, use m4.xlarge EC2 instances
General Cluster Settings
Here we give a distinct name to the cluster i.e. MyEMRCluster, which will stand out if you have a bunch of terminated clusters in your EMR console window
Security
In this step, we have to provide the key-pair to login into our EMR cluster. It’s very important that this key-pair must be downloaded in the local system else we would not be allowed to login to our EMR cluster. EC2 key pair you have already created and downloaded in above steps.
We can now see our cluster will start in a few minutes.
Now, finally our cluster is ready to use.
PySpark and Snowflake Integration
- Login to EMR cluster
Now we can login our cluster via terminal.
- Windows Users: You can use PUTTY (download link) to SSH into the Master Node.
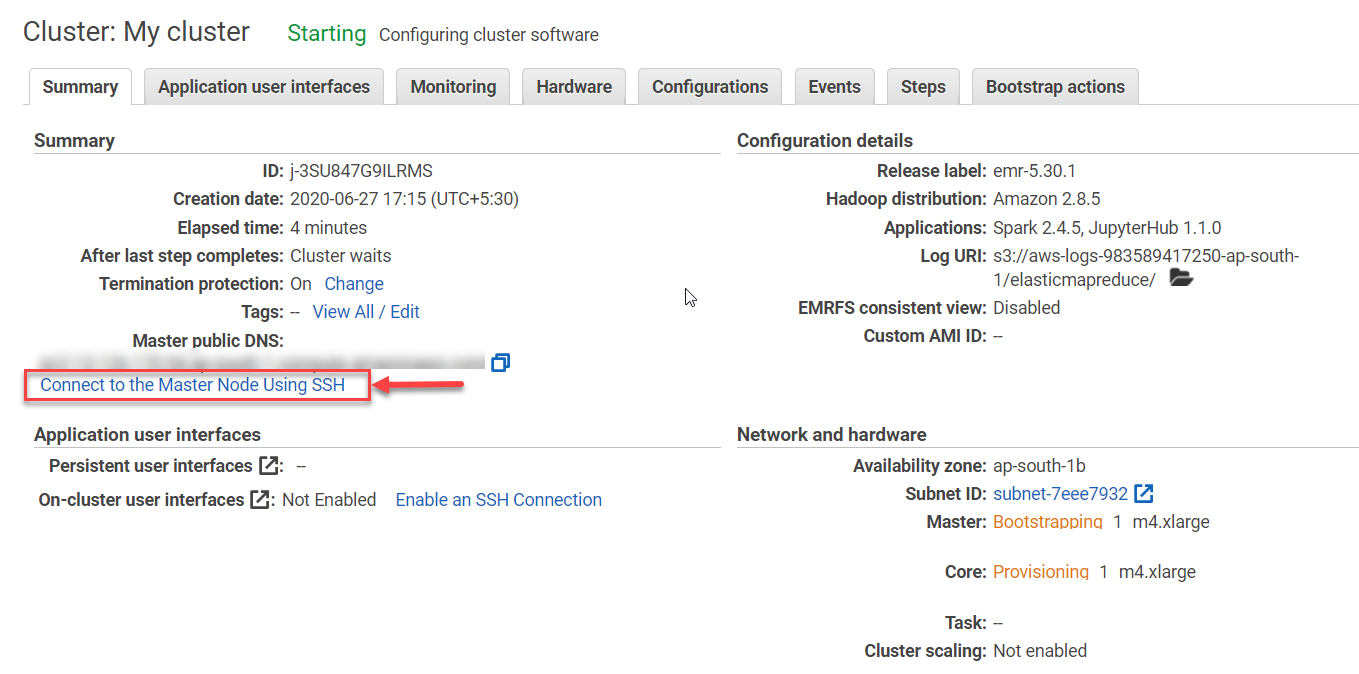
Click on Connect to the Master Node Using SSH link which will give you detailed instructions for logging in.
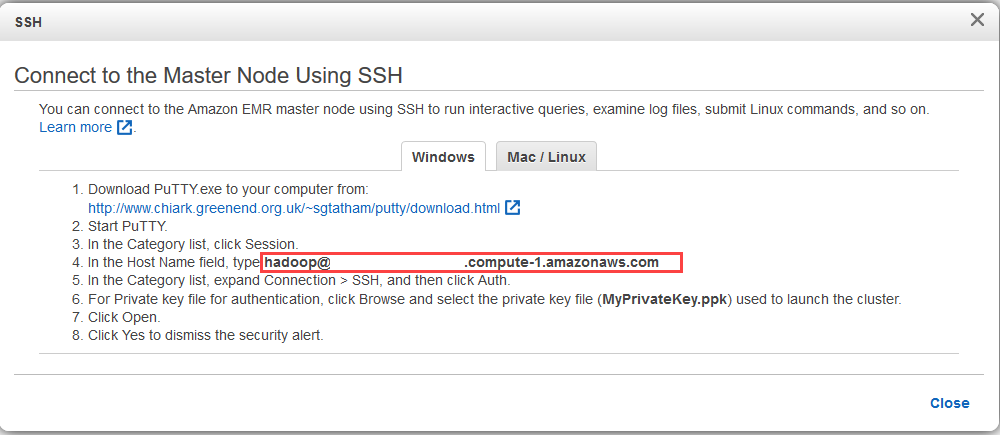
Use this host name (provided by aws) to jump into the Master Node which logs you in using hadoop username (super user).

- On Mac OS X
1. Open a terminal window. On Mac OS X, choose Applications > Utilities > Terminal. On other Linux distributions, terminal is typically found at Applications > Accessories > Terminal.
2. To establish a connection to the master node, type the following command. Replace ec2-###-##-##-###.compute-1.amazonaws.com with the master public DNS name of your cluster and replace ~/mykeypair.pem with the location and file name of your .pem file.
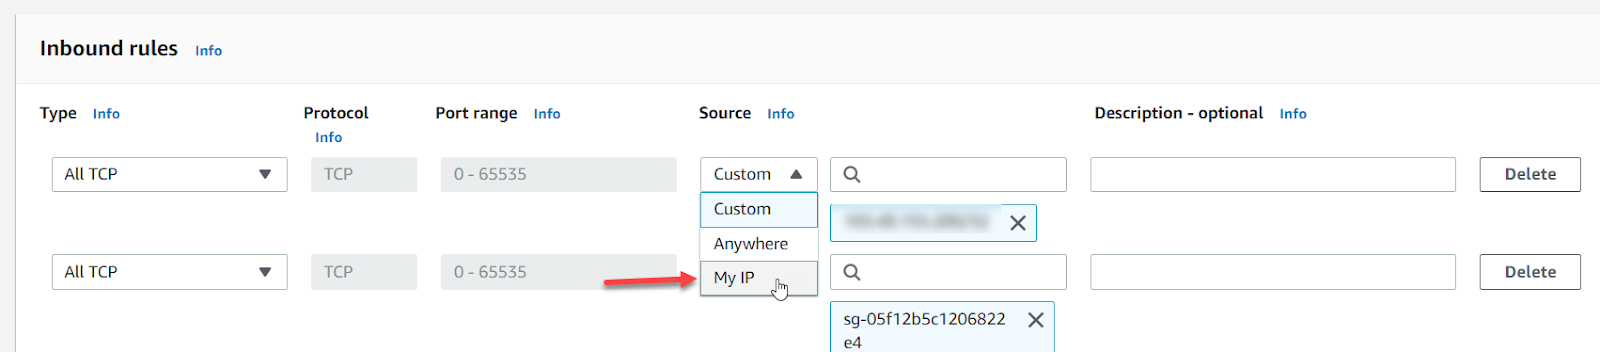
2. Security Group Configuration
This Configuration allows any IP address to connect to your EMR cluster; be it TCP or SSH which we normally use to login into the EC2 instances.
Add your IP in Security groups for Master and Security groups for Core
Click on MyIP in Source
3. Open shell
In the Session section paste the hostname and use 22 as the port.
In the Connection -> SSH section click on Auth.
Click on Open
Add below spark.jars.packages in /etc/spark/conf/spark-defaults.conf
Then :wq to save and close the file
Click on Application User Interface and click on JupyterHub User Interface link
JupyterHub on Amazon EMR has a default user with administrator permissions. The user name is jovyan and the password is jupyter.
- SF_ACCOUNT: Account name, e.g. yourcompany.
- SF_USER: User login name.
- SF_PWD: User password to log in with.
- SF_DB: The default database to use for the session after connecting.
- SF_SCHEMA: The default schema to use for the session after connecting.
- SF_WAREHOUSE: The default virtual warehouse to use for the session after connecting.
Run the query below. It will show for each hour the number of trips, average trip duration, and average trip distance.


