Introduction
In the previous blog we have explored the Azure SQL basics. Today, we would explore how we can implement Star and Snowflake schemas in Azure SQL.
Star and Snowflake schemas are the most commonly used schemas when it comes to the database models. Both have their pros and cons. When the data is in normalized form, we use the Snowflake schema and when we have denormalized data the Star schema is used.
Let’s see how we can create these in Azure SQL.
Learning Objectives
- What is a Star Schema?
- What is a Snowflake Schema?
- Star Schema vs. Snowflake Schema
- Hands-On: Implementing Star and Snowflake schema in Azure SQL
What is a Star Schema?
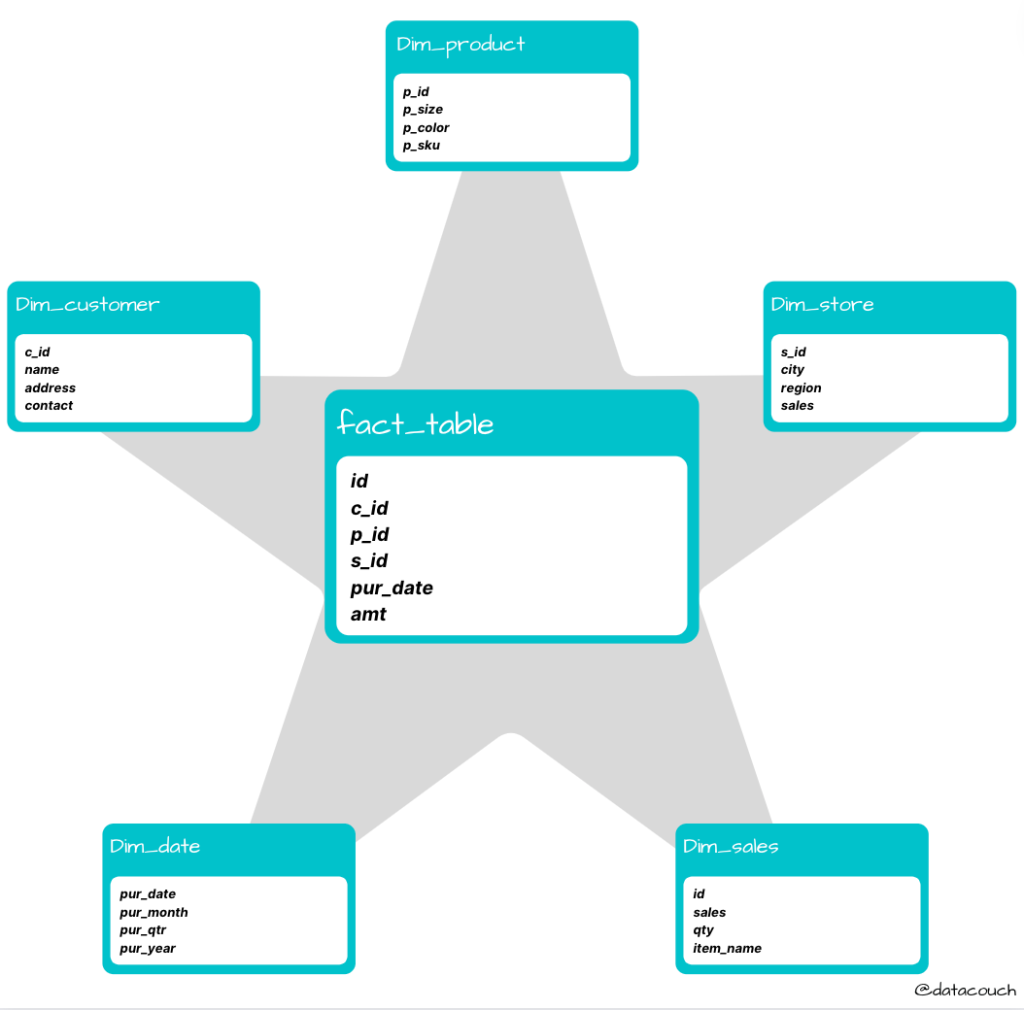
It is one of the simplest styles of schema and is most widely used to develop data warehouses and multi-dimensional data marts. The star schema consists of one or more fact tables, each referencing any number of dimension tables. The star schema is an important special case of the snowflake schema, and is more effective for handling simpler queries.
What is a Snowflake Schema?
It is a logical arrangement of tables in a multi-dimensional database such that the entity relationship diagram resembles a snowflake shape. The snowflake schema is represented by centralized fact tables which are connected to multiple dimensions.
Star Schema vs Snowflake Schema
Star Schema | Snowflake Schema |
In star schema, fact tables and the dimension tables are present. | In snowflake schema, fact tables, dimension tables, as well as sub-dimension tables are present. |
This is a top-down model i.e. seeks to identify the big picture and all of its components | It is a bottom-up model i.e. first focuses on solving the smaller problems at the fundamental level and then integrating them into a whole and complete solution |
Star schema requires more space | The space requirement is lesser. |
It takes less time for the execution of queries | It takes more time than star schema for the execution of queries |
In star schema, normalized data is not used | Both normalized and denormalized data are used |
It’s design is very simple | It’s design is complex. |
The complexity of the queries is low. | The complexity of queries is greater. |
Hands-On: Implementing Star and Snowflake schemas in Azure SQL
Step 1: Setting up the Environment
To get started with Azure SQL, first of all search for SQL Database in the search bar and select the SQL Databases.

Now, click on the “+ Create” button present on the top left section of the page.
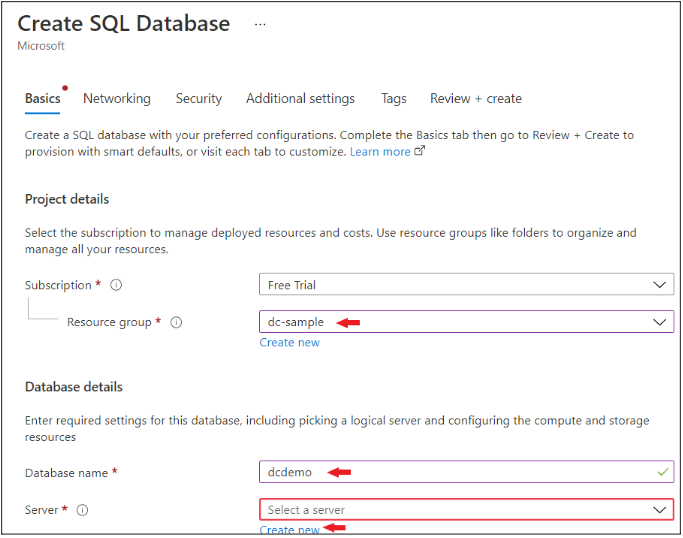
Under the Basic tab, select your Resource group. Then give a name to your database (in our case it’s dcdemo). Finally click on the Create new button in front of the Server option.
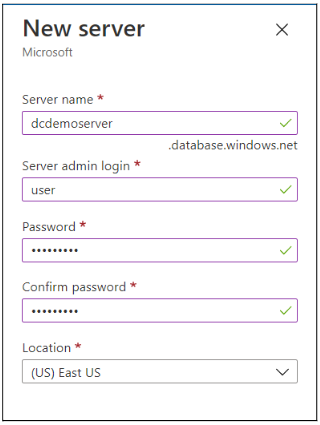
Now, give your server a name (in our case it’s dcdemoserver), then enter admin as your username and create a password as well.
Once this is done, click on the Create button.
Go to Additional Settings tab and for Use existing Data select Sample.
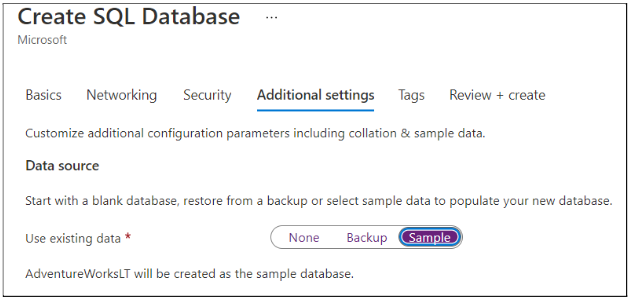
After this, click on the Review + Create button.
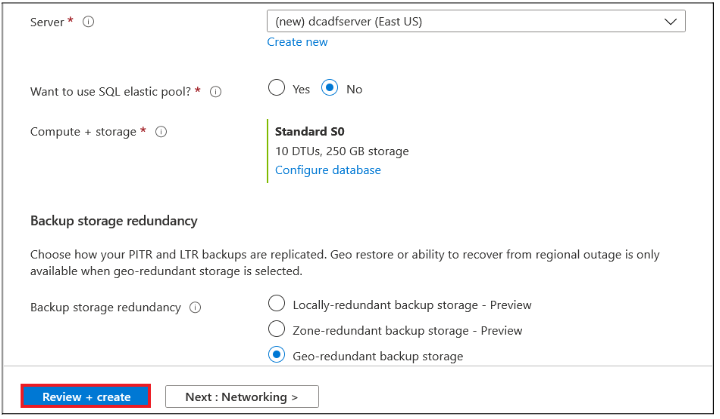
Then, finally click on the Create button.
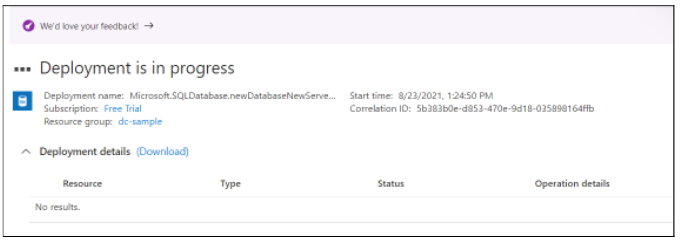
It will take 2-3 minutes for creating the SQL Database.
Now, go to the Resource Group and click on the SQL Database that you have created.

From the leftmost section, click on the Query Editor (Preview) button.

It would ask for the username and password that you have created during the creation time of the server. Enter user id & password and click on OK.
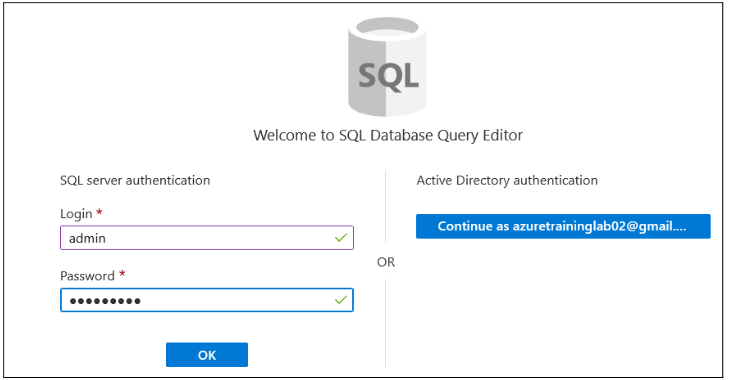
Note: If you would be get this error message:
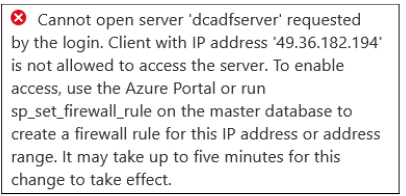
To resolve this error, we must add our IP into the firewall of the server that we have created.
For doing so, open the Resource group from home in a separate tab and click on the server that you have created.

Now, from the leftmost section, scroll down to Security and click on Firewall and Virtual Networks.
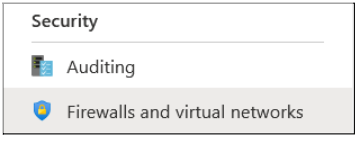
After this, click on + Add Client IP” button and then click on save.

Your IP gets added into the firewall automatically.

Now, let’s head back to the login page for SQL Database and try again. This time we would be able to login to the system successfully.
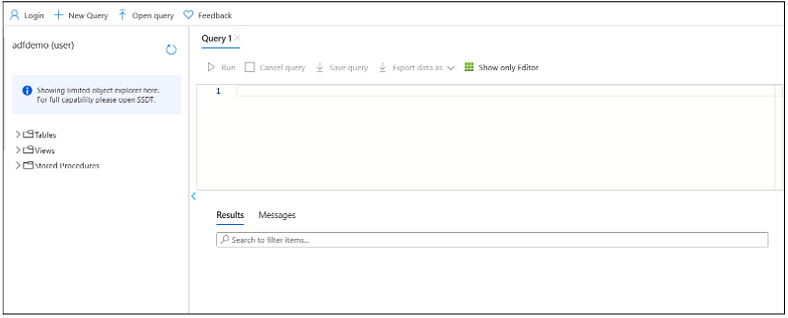
Step 2: Working with Star Schema
First of all let’s create a Star Schema within Azure SQL. So let’s see what does our Star Schema look like:
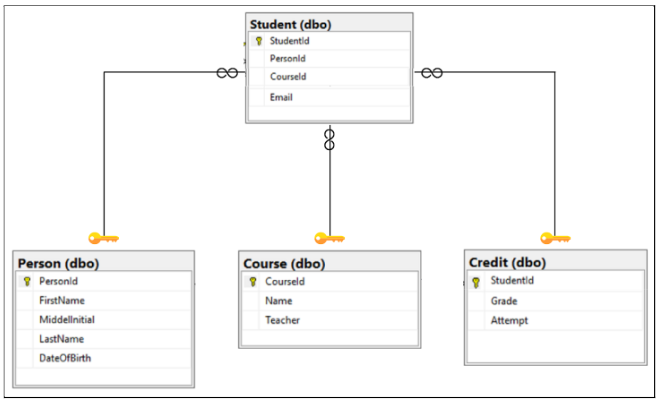
For creating the above structure, run the following commands or you can download sql script which would create the tables and populate them automatically. You must upload the script to Azure SQL and click on the Run button.
- Commands for creating tables:
					-- Create Person table
CREATE TABLE Person
(
	PersonId INT IDENTITY PRIMARY KEY,
	FirstName NVARCHAR(128) NOT NULL,
	MiddleInitial NVARCHAR(10),
	LastName NVARCHAR(128) NOT NULL,
	DateOfBirth DATE NOT NULL
)
-- Create Course table
CREATE TABLE Course
(
	CourseId INT IDENTITY PRIMARY KEY,
	Name NVARCHAR(50) NOT NULL,
	Teacher NVARCHAR(256) NOT NULL
)
-- Create Credit table
CREATE TABLE Credit
(
	StudentId INT IDENTITY PRIMARY KEY,
	Grade DECIMAL(5,2) CHECK (Grade <= 100.00),
	Attempt TINYINT,
	CONSTRAINT [UQ_studentgrades] UNIQUE CLUSTERED
	(
    	StudentId, Grade, Attempt
	)
)
-- Create Student table
CREATE TABLE Student
(
	StudentId INT REFERENCES Credit (StudentId),
	PersonId INT REFERENCES Person (PersonId),
       CourseId INT REFERENCES Course (CourseId),
	Email NVARCHAR(256)
)
- Now, run the following command for populating the data into the tables:
					-- Inserting data into Person Table
SET IDENTITY_INSERT Person ON;
INSERT INTO Person (PersonId, FirstName, MiddleInitial, LastName, DateOfBirth) VALUES
(1,'Adele','S','Rosales','1984-05-05'),
(2,'Justus','Z','Gomez','2007-04-06'),
(3,'Isiah','Z','Warner','1992-06-04'),
(4,'Erica','L','Campos','1994-05-14'),
(5,'Desmond','W','Valdez','1996-11-19');
-- Inserting data into Course Table
SET IDENTITY_INSERT Course ON;
INSERT INTO Course (CourseId, Name, Teacher) VALUES
(1,'Circuit Analysis','Kellen Horton'),
(2,'Calculus','Kamron Saunders'),
(3,'Introduction to Law','Dominick Pope'),
(4,'Circuit Analysis','Gerardo Grimes'),
(5,'Human Ecology','Elaine Cabrera');
-- Inserting data into Credit Table
SET IDENTITY_INSERT Credit ON;
INSERT INTO Credit(StudentId, Grade, Attempt) VALUES
(554,99.89,1),
(468,85.15,2),
(34,22.69,2),
(460,48.32,3),
(469,90.53,1);
-- Inserting data into Student Table
INSERT INTO Student (StudentId, PersonID, CourseId, Email) VALUES
(554,1,2,'AdeleRosales@university.com'),
(468,2,1,'IsiahWarner@university.com'),
(34,3,4,'DesmondValdez@university.com'),
(460,4,5,'AliBowen@university.com'),
(469,5,3,'HaleighHopper@university.com');
Now we are ready with the Star schema. Here you can see that we have a denormalized schema with us.
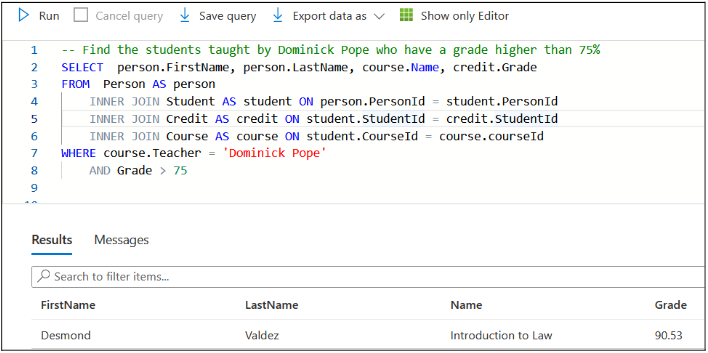
Let’s run a query on this schema and see how complex it is. Suppose, we want to find the students taught by Domnick Pope who have a grade higher than 75%.
					SELECT  person.FirstName, person.LastName, course.Name, credit.Grade
FROM  Person AS person
    INNER JOIN Student AS student ON person.PersonId = student.PersonId
    INNER JOIN Credit AS credit ON student.StudentId = credit.StudentId
    INNER JOIN Course AS course ON student.CourseId = course.courseId
WHERE course.Teacher = 'Dominick Pope'
    AND Grade > 75
Step 3: Working with Snowflake Schema
Now, let’s see how our normalized Snowflake schema would look like for the above example:
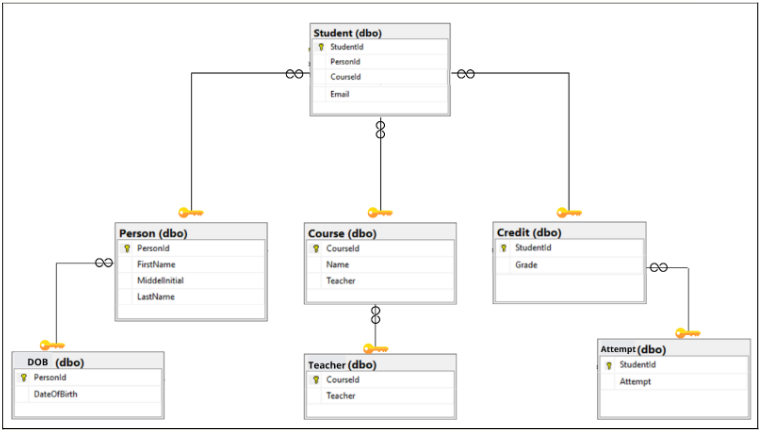
Before running the commands to create the tables in the snowflake schema, kindly make sure you have run the drop command for all the tables created with star schema.
DROP TABLE <table-name>;
Note:
Here <table-name> would be Student, Person, Credit, Course.
Do delete the tables in this sequence (Student, Person, Credit, Course) only.
Let’s replicate the above example of snowflake schema within Azure SQL. Run the following commands for creating the tables using snowflake schema:
					— Create Person table
CREATE TABLE Person
(
PersonId INT IDENTITY PRIMARY KEY,
FirstName NVARCHAR(128) NOT NULL,
MiddleInitial NVARCHAR(10),
LastName NVARCHAR(128) NOT NULL,
)
 — Create DOB table
CREATE TABLE DOB
(
PersonId INT IDENTITY PRIMARY KEY REFERENCES Person (PersonId),
DateOfBirth DATE NOT NULL
)
 — Create Course table
CREATE TABLE Course
(
CourseId INT IDENTITY PRIMARY KEY,
Name NVARCHAR(50) NOT NULL,
)
 — Create Teacher table
CREATE TABLE Teacher
(
CourseId INT IDENTITY PRIMARY KEY REFERENCES Course (CourseId),
Teacher NVARCHAR(256) NOT NULL
)
 — Create Credit table
CREATE TABLE Credit
(
StudentId INT IDENTITY PRIMARY KEY,
Grade DECIMAL(5,2) CHECK (Grade <= 100.00),
CONSTRAINT [UQ_studentgrades] UNIQUE CLUSTERED
(
StudentId, Grade
)
)
 — Create Attempt Table
CREATE TABLE Attempt
(
StudentId INT IDENTITY PRIMARY KEY REFERENCES Credit(StudentId),
Attempt TINYINT
)
 — Create Student table
CREATE TABLE Student
(
StudentId INT REFERENCES Credit (StudentId),
PersonId INT REFERENCES Person (PersonId),
CourseId INT REFERENCES Course (CourseId),
Email NVARCHAR(256)
)
Populate the above tables using the following commands:
					— Inserting data into Person Table
SET IDENTITY_INSERT Person ON;
INSERT INTO Person (PersonId, FirstName, MiddleInitial, LastName) VALUES
(1,’Adele’,’S’,’Rosales’),
(2,’Justus’,’Z’,’Gomez’),
(3,’Isiah’,’Z’,’Warner’),
(4,’Erica’,’L’,’Campos’),
(5,’Desmond’,’W’,’Valdez’);
 — Inserting data into DOB table
SET IDENTITY_INSERT DOB ON;
INSERT INTO DOB (PersonId, DateOfBirth) VALUES
(1,’1984–05–05'),
(2,’2007–04–06'),
(3,’1992–06–04'),
(4,’1994–05–14'),
(5,’1996–11–19');
 — Inserting data into Course Table
SET IDENTITY_INSERT Course ON;
INSERT INTO Course (CourseId, Name) VALUES
(1,’Circuit Analysis’),
(2,’Calculus’),
(3,’Introduction to Law’),
(4,’Circuit Analysis’),
(5,’Human Ecology’);
 — Inserting data into Teacher table
SET IDENTITY_INSERT Teacher ON;
INSERT INTO Teacher (CourseId, Teacher) VALUES
(1,’Kellen Horton’),
(2,’Kamron Saunders’),
(3,’Dominick Pope’),
(4,’Gerardo Grimes’),
(5,’Elaine Cabrera’);
 — Inserting data into Credit Table
SET IDENTITY_INSERT Credit ON;
INSERT INTO Credit(StudentId, Grade) VALUES
(554,99.89),
(468,85.15),
(34,22.69),
(460,48.32),
(469,90.53);
 — Inserting data into Attempt Table
SET IDENTITY_INSERT Attempt ON;
INSERT INTO Attempt(StudentId, Attempt) VALUES
(554,1),
(468,2),
(34,2),
(460,3),
(469,1);
 — Inserting data into Student Table
INSERT INTO Student (StudentId, PersonID, CourseId, Email) VALUES
(554,1,2,’AdeleRosales@university.com’),
(468,2,1,’IsiahWarner@university.com’),
(34,3,4,’DesmondValdez@university.com’),
(460,4,5,’AliBowen@university.com’),
(469,5,3,’HaleighHopper@university.com’);
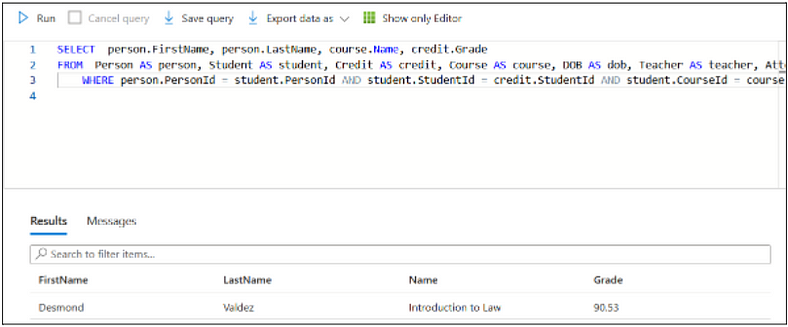
Here we can see that we have to make 6 different joins.
This was a small example. Now, think about if we are having a lot of tables then we have to make many more joins. It could give a severe headache to anyone.
So, we usually have the following two scenarios:
- Normalized Data: In this case we use the Snowflake schema, which would help to look at the database from the central level.
- Denormalized Data: In this case we use the Star schema, which would help to look at the database from the regional level.
Although both have their pros and cons. Such as, in the Star schema, we have denormalized data which can act as a mess. While in the Snowflake schema, we have normalized data because of which we have to deal with a lot of joins.
We have successfully implemented the Star & the Snowflake schemas in Azure SQL. In the next blog we would be exploring the CosmosDB Service within Azure Cloud. Till then Keep Learning, Keep Exploring, and Keep Practicing.
